Matched Content

Thursday, December 21, 2023

Honda Instruments And Dashboard Lights Flickering


This repair procedure can also be applied to other brands of vehicle (Toyota, Nissan, Ford, VW, Mitsubishi, Opel, Suzuki, etc.), and other electronic devices, which are compromised by moisture condensing inside the electronic devices.

If serious damage has not occurred yet, the electronic system will return to normal operation after the dew dries. However it is possible that the system may not return to normal immediately, and further diagnosis may be required.

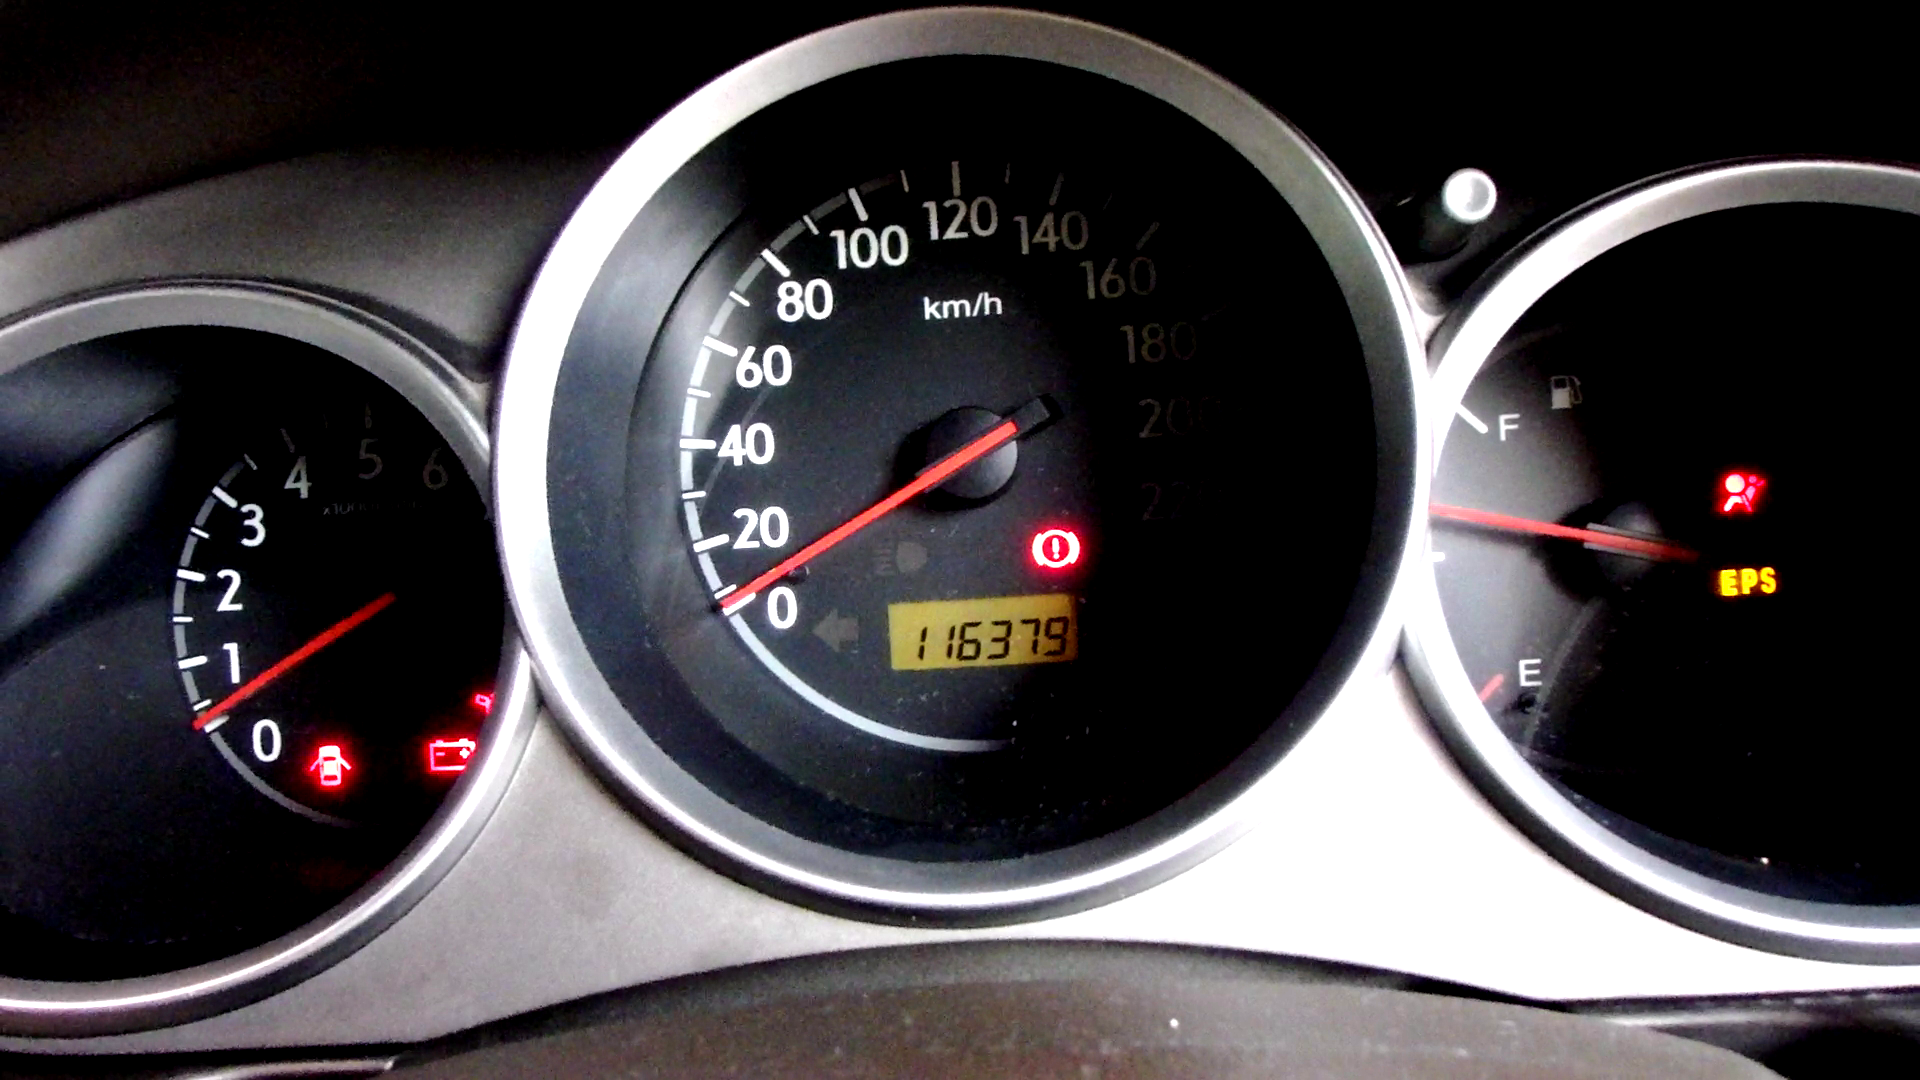
Honda Jazz (GD3) and City (GD8) odometer flickering and fuel meter not working. The dashboard lighting also flickering, as do several warning signs such as: airbags, temperature, etc. But in my case, the tachometer and parking brake still functioned normally.

Before repairs are carried out, as a safety measure, first disconnect the negative connector from the battery.


Remove the dashboard outer frame by pulling it by hand.


Remove the 4 screws holding the inner frame. It requires a fairly long Phillips screwdriver, because of the deep position of those screws. The screwdriver must also have a strong magnet, to hold the screw so it doesn't fall. If a screw falls into the dashboard, it will be difficult to find it. There is also a risk of short circuit, if the screw lands on to an open wire or connector. Pull the frame out, after the 4 screws are removed.


Remove the 5 dashboard cap holder screws. This cap has 5 clips, be careful not to let any of the clips come loose when the cap is pulled out.


When the cap is removed, two connectors (blue and green) can be accessed.


Spray both connectors with WD-40. Because the connector is in an upright position, WD-40 liquid can seep down into the connector holes. No need to remove the connector.


The photo above was taken from outer side of the windshield, so you can see a shadow on the windshield. It can be seen that the WD-40 hose is being kept upright above the connector so that the spray immediately enters the holes in the connector.

To find out the results of repairs, testing can be carried out if you are sure that there are no screws or clamps that have come loose and fallen into the dashboard. Reconnect the negative battery cable terminal. Turn the ignition key to the On position.

If there is a dirty connector, it will usually return to normal after the WD-40 liquid has been absorbed.

If it turns out that the odometer, fuel meter or other instruments are not normal yet. So the two connectors have to be disconnected by pressing the clip on the back of the connector. Then the connector is pulled up. Usually after spraying with WD-40, the connector is easier to remove.

Do this carefully because the conductor inside the connector is very delicate like a needle. Next, spray WD-40 again on the male and female connectors. Carefully reconnect the connector.

Cleaning connectors in this way, by simply spray WD-40 from the back, without removing the connector, can also be applied to other connectors such as for: radio, tape, CD, mp3 player, alarm, wiper, horn, GPS, and others. Especially equipment with low current or electric power.

It should be noted that today's car electronic equipment is very susceptible to moisture. The presence of water in the cabin, such as drinks without lids, rainwater seepage, damp carpet, which is left for too long for days, can cause interference with electronic devices such as: Engine Control Module (ECM), Body Control Module (BCM), speedometer , odometer, fuelmeter, tachometer, radio, tape, dvd player, mp3 player, GPS, etc.

Water vapor can enter electronic devices. Then water vapor can condense inside electronic devices. Dew will disrupt electronic systems.

If serious damage has not occurred yet, the electronic system will return to normal when the dew dries or evaporates again.

Carpet pads are a type of foam pad used under carpets. Its main function is as a sound dampener.

If it is already wet, the foam under the carpet is difficult to dry. If the foam is damp, the carpet above it can sometimes appear dry. For this reason, the carpet must be parted so that the foam can be checked to see whether it is damp or dry. If it is damp, it is best to remove the foam and dry it outside the cabin to prevent condensation forming in electronic devices.

If there is dew under the rubber or plastic foot mat, or sometimes the car window glasses become foggy in the morning on the inside, after parking overnight. This could be a sign that the foam is damp, as shown below.


In the left part of the photo above, the black one is the rubber foot mat, it looks like the mat bottom is wet with dew. The cream colored one is carpet that looks dry. Meanwhile, the yellow one is foam, it looks dry, but if you touch it with your hand, the foam feels moist.

Sometimes this foam is difficult to remove, because it is large, without joints, and covered by a carpet which is also large without joints. To remove the carpet and foam, you must remove the upholstery (seat). A vacuum cleaner that can suck water (wet and dry) can be used to dry damp carpet and foam, without removing the carpet and foam. Jet of air from a vacuum cleaner, air compressor, fan, can be used to dry carpet and foam. By blowing down the foam and the carpet is uncovered.

Towel, chamois, other absorbent cloth, newspaper, cardboard, can be used to absorb water from carpet and foam. By tucking it under the carpet and foam. But you have to be careful if there is thick cloth or paper under the carpet, if the car is driven. Because the thick cloth and paper can shift and interfere with the brake, gas and clutch pedals.

A moisture absorber bag (dehumidifier bag) can be used to absorb water vapor from inside the car, thus drying the carpet and foam. Usually filled with calcium chloride or silica gel as a water absorber. Place it near a damp area, close the car door and glass tightly. After a few hours, the bag will be saturated with water, then put it in the sun for drying. The bag can also be dried in the microwave, then reused.

The lubricating oil contained in WD-40 is stickier and easier to be absorbed than water. So it can repel water that has stuck to the conductor, prevent dew from sticking again, and a layer of oil can prevent rust. But it is not suitable for dusty environments, because dust can collect and stick to the oil.

There is another cleaning option, namely WD-40 Specialist Contact Cleaner. This product can clean oil, dirt and water condensation on sensitive electronic and electrical equipment. This product dries quickly, leaving no oil or residue. Safe and ideal for use on printed circuit boards (PCB), battery terminals, switches, relay, fuses, electrical panels, connectors, etc. Because this product does not leave oil and residue, it is suitable for dusty environments. So that dust does not collect and stick to the oil.

Apart from WD-40, there is also Standard Contact Cleaner Lubricant, which contains lubricating oil.

Meanwhile, CRC CO Contact Cleaner does not contain lubricating oil, and dries quickly without leaving a trace in less than one minute.


Tuesday, November 21, 2023

Honda Instrumen Dan Lampu Dashboard Berkedip


Prosedur perbaikan ini dapat juga diterapkan pada kendaraan merk lain (Toyota, Nissan, Ford, Suzuki, dan lain-lain), dan perangkat elektronik lain, yang terganggu oleh uap air yang mengembun di dalam perangkat elektronik.

Jika kerusakan serius belum terjadi, sistem elektronik akan kembali beroperasi normal setelah embun mengering. Namun ada kemungkinan sistem tidak segera kembali normal dan diagnosis lebih lanjut mungkin diperlukan.

Honda Jazz (GD3) dan City (GD8) odometer berkedip dan pengukur bensin (fuelmeter) tidak berfungsi. Lampu penerang dashboard juga berkedip, demikian juga beberapa tanda peringatan seperti: airbag, temperatur, dan lain-lain. Tapi pada kasus yang saya alami, tachometer, rem parkir, masih berfungsi normal.


Sebelum perbaikan dilakukan, sebagai langkah pengamanan, terlebih dulu lepaskan konektor negatif dari aki.


Lepaskan bingkai dashboard dengan cara menariknya.


Lepaskan 4 sekrup yang memegang bingkai dalam. Dibutuhkan obeng kembang (plus, positif) yang cukup panjang, karena posisi sekrup yang dalam. Obeng juga harus berdaya magnet kuat, untuk memegang sekrup agar tidak jatuh. Jika sekrup jatuh ke dalam dashboard, maka akan sulit mencarinya. Juga ada resiko korslet (hubung singkat, arus pendek), jika sekrup mengenai kabel atau konektor yang terbuka. Tarik bingkai tersebut, setelah 4 sekrup terlepas.


Lepaskan 5 sekrup pemegang topi dashboard. Topi ini mempunyai 5 klip, hati-hati jangan sampai ada klip terlepas, saat topi ditarik.


Saat topi sudah terlepas maka dua konektor (biru dan hijau) akan terlihat.


Semprot kedua konektor dengan WD-40. Karena posisi konektor tegak, maka cairan WD-40 dapat meresap turun ke dalam lubang-lubang konektor. Tidak perlu melepas konektor. 

Foto di atas diambil dari balik kaca depan, sehingga tampak adanya bayangan pada kaca. Tampak selang WD-40 diupayakan tegak di atas konektor agat semburannya segera masuk ke lubang-lubang pada konektor.

Untuk mengetahui hasil perbaikan, pengujian dapat dilakukan jika Anda yakin tidak ada sekrup ataupun klem yang terlepas dan jatuh ke dalam dashboard. Pasang kembali terminal kabel negatif aki. Putar kunci kontak pada posisi On. 

Jika memang ada konektor yang kotor maka biasanya akan kembali normal setelah cairan WD-40 meresap.

Jika ternyata odometer, fuelmeter, ataupun instrumen lainnya, belum normal. Maka kedua konektor terpaksa harus dibuka dengan menekan klip di belakang konektor. Lalu konektor ditarik ke atas. Biasanya setelah disemprot WD-40, konektor lebih mudah dilepas. 

Lakukan dengan hati-hati karena konduktor di dalam konektor sangat halus seperti jarum. Selanjutnya semprotkan lagi WD-40 pada konektor jantan dan betina. Pasang kembali konektor dengan hati-hati.

Membersihkan konektor dengan cara ini, cukup disemprot WD-40 dari belakang, tanpa melepas konektor, juga dapat diterapkan pada konektor lain seperti untuk: radio, tape, CD, mp3 player, alarm, wiper, klakson. dan lain-lain. Terutama peralatan dengan arus atau daya listrik rendah.

Perlu diperhatikan bahwa peralatan elektronik mobil zaman sekarang sangat rentan terhadap kelembaban. Adanya air di dalam kabin, seperti minuman tanpa tutup, rembesan air hujan, karpet lembab, yang dibiarkan terlalu lama sampai berhari-hari, dapat menyebabkan gangguan pada perangkat electronik seperti: Engine Control Modul (ECM), Body Control Modul (BCM), speedometer, odometer, fuelmeter, tachometer, radio, tape, dvd player, mp3 player, GPS, dan lain-lain.

Uap air dapat masuk ke dalam perangkat elektronik. Lalu uap air dapat mengembun di dalam perangkat elektronik. Air embun akan mengacaukan sistem elektronik.

Jika belum terjadi kerusakan parah, sistem elektronik akan kembali normal saat embun sudah kering atau menguap kembali.

Bantalan karpet adalah jenis bantalan busa yang digunakan di bawah karpet. Fungsi utamanya sebagai peredam suara. 

Jika terlanjur basah, busa di bawah karpet sulit dikeringkan. Jika busa lembab, karpet di atasnya kadang tampak kering. Untuk itu karpet harus disibak agar busa dapat dicek apakah lembab atau kering. Jika lembab, sebaiknya busa dilepas dan dikeringkan di luar kabin agar tidak terjadi kondensasi pada perangkat elektronik. 

Jika di bawah karet atau plastik alas kaki terdapat embun, atau kadang kaca mobil berembun di pagi hari di bagian dalamnya, setelah parkir semalaman. Hal ini bisa jadi pertanda bahwa busa dalam kondisi lembab, sebagaimana foto di bawah.


Pada bagian kiri foto di atas, yang berwarna hitam adalah alas kaki karet, tampak di bawahnya basah oleh embun. Yang berwarna krem adalah karpet yang terlihat kering. Sedangkan yang berwarna kuning adalah busa, terlihat kering, tapi kalau diraba tangan, busa ini terasa lembab.

Kadang busa ini sulit dilepas, karena ukurannya yang besar, tanpa sambungan, dan tertutup karpet yang juga besar tanpa sambungan. Untuk melepas karpet dan busa, harus melepas jok (kursi). Vacuum cleaner (penyedot debu) yang dapat mengisap air (basah kering), bisa digunakan untuk mengeringkan karpet dan busa yang lembab, tanpa melepas karpet dan busa. Semburan angin dari vacuum cleaner, kompresor angin, kipas angin, bisa digunakan untuk mengeringkan karpet dan busa. Dengan meniup ke bawah busa dan karpet yang disibak (dibuka sedikit).

Handuk, chamois, kain penyerap lainnya, kertas koran, kertas karton, kardus, bisa digunakan untuk menyerap air dari karpet dan busa. Dengan cara menyelipkan di bawah karpet dan busa. Tapi harus berhati-hati jika ada kain atau kertas tebal di bawah karpet, jika mobil dikendarai. Karena kain dan kertas tebal tersebut dapat bergeser dan mengganggu pedal rem, gas dan kopling.

Kantong penyerap lembab (dehumidifier bag) bisa digunakan untuk menyerap uap air dari dalam mobil, sehingga mengeringkan karpet dan busa. Biasanya diisi dengan kalsium klorida atau gel silika sebagai penyerap air. Letakkan di dekat bagian yang lembab, tutup rapat pintu dan kaca mobil. Setelah beberapa jam, kantong akan jenuh air, lalu dijemur agar kering kembali. Kantong bisa juga dikeringkan dengan microwave, lalu digunakan kembali.

Minyak pelumas yang terkandung pada WD-40 lebih lengket dan lebih meresap daripada air. Sehingga dapat menepis air yang sudah menempel pada konduktor, mencegah embun menempel kembali, dan lapisan minyak dapat mencegah karat. Tapi tidak cocok untuk lingkungan berdebu, karena debu dapat terkumpul dan menempel pada minyak.

Ada pilihan pembersih lain, yaitu menggunakan WD-40 Specialist Contact Cleaner. Produk ini dapat membersihkan oli, kotoran, dan kondensasi air pada peralatan elektronik dan listrik sensitif. Produk ini cepat kering, tidak meninggalkan minyak dan residu. Aman dan ideal untuk digunakan pada papan sirkuit tercetak (Printed Circuit Board, PCB),  terminal baterai / aki, saklar, relai, sekring, panel listrik, konektor, dan lain-lain. Karena produk ini tidak meninggalkan minyak, maka cocok untuk lingkungan berdebu. Sehingga debu tidak terkumpul dan lengket pada minyak.

Selain WD-40, ada juga Standard Contact Cleaner Lubricant, yang mengandung minyak pelumas. 

Sedangkan CRC CO Contact Cleaner tidak mengandung minyak pelumas, dan cepat kering tanpa bekas dalam waktu kurang dari satu menit.


Saturday, October 21, 2023

Website Domain Address and Adsense txt


Some time ago my Adsense account displayed the following message.


Earnings at risk - You need to fix some ads.txt issues to avoid severe impact to your revenue.

ADS, which stands for Authorized Digital Sellers, is an initiative of the Interactive Advertising Bureau (IAB) Tech Lab to increase transparency in programmatic advertising. This allows publishers to identify who is authorized to sell their inventory. This is a small document (ads.txt) where the adsense account number is written, and it is embedded in the domain.

It turns out that the problem with ads.txt occurred because there was a problem with accessing the domain address.

Before fixing the settings, my site could only be accessed with the address:

https://www.atsunday.com


Meanwhile, if you use another address format it will not be found by search engines, such as:

Without secure address:

Http://www.atsunday.com

Domain addresses without World Wide Web (WWW) or also known as naked addresses cannot be accessed:

https://atsunday.com


It has been set so that those addresses connect to each other but it doesn't work.

It turns out there is a trick to setting it.


As suggested on the blogger help community:


I focus on doing steps 1 to 10 which are relevant for my site.

1. go to your https://www.blogger.com dashboard

2.  open Settings tab

3.  Make sure that "Redirect domain" is enabled

4. scroll down to "HTTPS"

5. disable "HTTPS availability"

6. wait 5 minutes and refresh the Settings tab

7. enable "HTTPS availability" again

8. wait 15-60 minutes* and refresh the Settings tab

9. enable "HTTPS redirect" if the status is "Available / OK"

10. then: clear the cache in your browser.

* Your SSL certificate will not be generated immediately, that's why you have to wait.

With "Redirect domain" and"HTTPS redirect" enabled, all links will be redirected to https://www....

After carrying out these steps, wait about 30 minutes. While waiting your site is not active, so it is not read by search engines. Then the display in Blogger Settings will appear as follows.


Your site will be active again, and read by search robots.

I finished setting it up around 11 am. The next morning around 6 o'clock, the status on AdSense changed.


As the above picture, it can be seen that the ads.txt status has been found, and the status is Authorized. Previously the status was Not Found.


Thursday, September 21, 2023

Alamat Domain Website dan Adsense txt


Beberapa waktu lalu akun adsense saya menampilkan pesan berikut.


Earnings at risk - You need to fix some ads.txt issues to avoid severe impact to your revenue.

Penghasilan berisiko - Anda perlu memperbaiki beberapa masalah ads.txt untuk menghindari dampak buruk terhadap pendapatan Anda.

ADS adalah singkatan dari Authorised Digital Sellers, adalah inisiatif dari Interactive Advertising Bureau (IAB) Tech Lab untuk meningkatkan transparansi dalam periklanan terprogram. Sehingga memungkinkan penerbit mengidentifikasi siapa yang berwenang untuk menjual inventaris mereka. Ini adalah sebuah dokumen kecil (ads.txt) di mana tertulis nomor akun adsense, dan disematkan pada domain.

Ternyata masalah pada ads.txt terjadi karena ada masalah pada akses alamat domain.

Sebelum diperbaiki setelannya, situs saya hanya dapat diakses dengan alamat:

Https://www.atsunday.com


Sedangkan jika menggunakan format alamat lain tidak akan ditemukan oleh mesin pencari, seperti:

Tanpa secure address:

Http://www.atsunday.com


Alamat domain tanpa World Wide Web (WWW) atau disebut juga naked address juga tidak bisa diakses:

Https://atsunday.com


Sudah sempat disetel agar alamat tersebut terhubung satu sama lain tapi tidak berfungsi.

Ternyata ada trik untuk menyetelnya.

Sebagaimana disarankan pada komunitas bantuan blogger:


Saya fokus melakukan langkah 1 sampai 10 saja. Sedangkan langkah di atasnya tidak relevan untuk situs saya.

pengaturan:

1. buka dasbor https://www.blogger.com Anda

2. buka tab Pengaturan

3. Pastikan "Pengalihan domain" diaktifkan

4. gulir ke bawah ke "HTTPS"

5. nonaktifkan "ketersediaan HTTPS"

6. tunggu 5 menit dan segarkan tab Pengaturan (setting)

7. aktifkan "ketersediaan HTTPS" lagi

8. tunggu 15-60 menit, dan segarkan tab Pengaturan

9. aktifkan "HTTPS redirect" jika statusnya "Available/OK"

10. lalu bersihkan cache (data sementara) di browser Anda.


Setelah melakukan langkah-langkah tersebut, tunggu sekitar 30 menit. Saat menunggu situs Anda tidak aktif, sehingga tidak terbaca oleh mesin pencari. Maka kemudian tampilan pada blogger setting akan tampak sebagaimana berikut.


Situs Anda akan aktif kembali, dan terbaca oleh robot pencari.

Penyetelan selesai saya lakuksn sekitar jam 11 siang. Keesokan paginya sekitar jam 6, status pada adsense berubah.


Terlihat status ads.txt sudah ditemukan dan statusnya menjadi Authorised. Sebelumnya status tersebut adalah Not Found.


Monday, August 21, 2023

Tekiro Ryu Sanding Machine Power Tool

Today's ceilings are smooth, plain and flat, without grout lines, sometimes made in stages. Popular ceiling materials are: gypsum, GRC, PVC, and plywood, etc..

In order for the ceiling to be flat and smooth, not wavy, it needs to be plastered with putty and then sanded. Sanding the ceiling is quite difficult, because of its position above the head. It will be easier if you sand the ceiling using a sanding machine.


The above is 180 watts RYU sanding machine. It is very user-friendly. But there is a weakness of the sanding machine, which is that it cannot be used on wet materials. Because the electric motor can be shorted. So the sanding process produces a lot of dust. You have to wear a mask covering your mouth and nose, and glasses to protect your eyes. It would be better if you also wear a face shield.


Meanwhile, if you sanding with wet sandpaper, the dust is sticking to the wet sandpaper. Usually, wet and dirty sandpaper can be rinsed with water, and it is more durable than dry sandpaper. But because the price of sandpaper is quite cheap, usually the cost of sandpaper is not a consideration.


The RYU model ROS13-1A machine uses 180x90 mm sandpaper size. For ceiling work according to the photo, use coarse sandpaper number 120.

You can also use coarser sandpaper, such as sandpaper number 80, to make the job faster. But there is a risk that the sanded area will become too thin, run out or the putty will be bald.


Sandpaper with a width of 10 cm is cut to a length of about 25 cm. Then clamped at both ends. In the photo above, it can be seen that the clamp lever can be rotated with the thumb to the bent inward position, the locked position, because the sandpaper is already pinched. Sandpaper that is 10 cm wide can usually be purchased in meter sizes.

Apart from sanding ceilings, this sanding machine can also be used for: doors, windows, walls, tile floors and bathrooms, tables, shelves, cabinets, benches, and other wide surfaces. It can also be used to sand a wide and flat car body. But of course not suitable for surfaces with lots of curves and complicated shapes.

RYU Power Tools is a brand originating from Japan that is produced by Tekiro Corporation.

Friday, July 21, 2023

Perkakas Mesin Amplas Sander Tekiro RYU


Plafon zaman sekarang lagi mode tipe polos dan rata, tanpa garis nat, kadang dibuat bertingkat. Material plafon yang populer saat ini adalah: gipsum, GRC, PVC, dan tripleks atau plywood.

Agar plafon rata dan mulus, tidak bergelombang  perlu didempul atau plamir dan kemudian diamplas. Mengamplas plafon cukup sulit, karena posisinya di atas kepala. Akan lebih mudah jika mengamplas plafon menggunakan mesin amplas.


Mesin amplas RYU berdaya 180 watt. Sangat mudah digunakan. Tapi ada kelemahan mesin amplas, yaitu tidak bisa digunakan pada bahan yang basah. Karena motor listriknya bisa konslet. Sehingga proses mengamplas menghasilkan banyak debu. Maka harus menggunakan masker menutupi mulut dan hidung, serta kacamata untuk melindungi mata. Akan lebih baik jika juga memakai pelindung wajah (face shield).

Sedangkan jika mengamplas sambil dibilas air, debunya tertangkap air. Biasanya kertas amplas yang basah bisa dibilas air dan lebih awet, daripada kertas amplas kering. Tapi karena harga kertas amplas cukup murah, maka biasanya biaya kertas amplas tidak menjadi pertimbangan.


Mesin RYU model ROS13-1A menggunakan amplas ukuran 180x90 mm. Untuk pekerjaan plafon sebagaimana foto, digunakan amplas kasar nomor 120. 

Bisa juga menggunakan amplas yang lebih kasar seperti amplas nomor 80, agar pekerjaan lebih cepat. Tapi beresiko bidang yang diamplas jadi terlalu tipis, habis atau botak dempulnya.


Amplas dengan ukuran  lebar 10 cm dipotong sepanjang sekitar 25 cm. Lalu dijepit kedua ujungnya. Pada foto di atas tampak tuas penjepit akan diputar dengan jari jempol ke posisi tertekuk ke dalam, posisi terkunci, karena amplas sudah terjepit. Amplas selebar 10 cm biasanya bisa dibeli dengan panjang meteran.

Selain untuk mengamplas plafon, mesin amplas ini juga bisa digunakan untuk: pintu, jendela, tembok dinding, keramik lantai dan kamar mandi, meja, rak, kabinet, bangku, dan berbagai bidang dengan permukaan yang lebar lainnya. Juga bisa digunakan untuk mengamplas bodi mobil yang lebar dan rata. Tapi tentu saja tidak cocok untuk permukaan yang banyak lekukan dan rumit bentuknya.

RYU Power Tools adalah brand atau merek yang berasal dari Jepang diproduksi oleh Tekiro Corporation.


Wednesday, June 21, 2023

Wall Nailing Tricks Without Concrete Nail


A common nail or wood nail can be used to nail the wall. It is not necessary to always use the wall nail (concrete nail, steel nail, panel pin).

The hard part on the brick wall is only the outer layer (finishing) of cement mortar with a thickness of about 1-2 mm. If the finishing layer has been successfully penetrated, it will be easy for the nail to go deeper.


The nail in the photo is a standard 5 cm long nail. Check that the point of the nail is sharp enough and that it is not bent or rusted. 5 centimeter nails are frequently used.

Place the nail against the wall at an angle of roughly 60 degrees. This nail position is commonly used to hang objects on walls, such as photo frames, paintings, calendars, wall clocks, clothes hangers, wall hangings, and key chains. Wall nails are also utilized for wall cabinets, LED televisions, split AC indoor unit mounts, telephones, modems, wifi routers, and other similar applications.

The more upright the nail is against the wall, the easier it is for the nail to pierce the wall.


Hold the hammer close to its head. Light blows should be used to tap the nail. With more frequent blows, around 2–3 blows every second.


The nail will struck forcefully if the hammer is held by the end of the handle or at the base of the handle. As a result, the nail will be bent. The wall will crack.

If the hard coating layer of the wall has been successfully penetrated, it will be easier for the nail to penetrate deeper into the wall.


In the photo above, the nail has penetrated the wall by about 1.5 cm. If you keep hitting that nail with the hammer, the nail will go deeper.

It can also be seen that the wall is not cracked because the nail was not hit hard, but the frequency of the blows was more frequent. This method of nailing can also be applied to concrete nails, so that the walls don't crack.

This nailing trick can also be seen in a YouTube video:


Walls with red bricks are usually tougher, but some red bricks can be penetrated by common nails. Lightweight bricks are easily penetrated by common nails.

Nails cannot penetrate the walls and pillars that are casted. Even the concrete nails cannot penetrate the casted part.

Although common nails are meant for wood, they can still be used to nail walls. But in Kalimantan and Sumatra, there is ironwood (Eusideroxylon zwageri) which is very hard. So it can only be nailed with concrete nails.


Sunday, May 21, 2023

Trik Memaku Dinding Tanpa Paku Beton

Paku kayu bisa digunakan untuk memaku tembok. Tidak harus selalu menggunakan paku tembok (paku beton, paku baja, panel pin).

Sebenarnya bagian yang keras pada dinding hanyalah lapisan terluar (finishing) semen acian setebal sekitar 1-2 mm. Jika lapisan acian sudah berhasil ditembus, maka akan mudah bagi paku untuk masuk lebih dalam.


Paku yang digunakan pada foto adalah paku kayu sepanjang 5 cm. Pastikan ujung paku cukup lancip, dan paku tidak bengkok, juga tidak berkarat. Paku 5 centimeter cukup sering digunakan.


Posisikan paku pada dinding dengan sudut sekitar 60 derajat terhadap dinding. Posisi paku tersebut sering digunakan, misalnya untuk menggantung benda pada dinding seperti: pigura foto, lukisan, kalendar, jam dinding, gantungan pakaian, hiasan dinding, gantungan kunci. Paku dinding juga digunakan untuk: lemari dinding, televisi LED, bracket unit indoor AC split, telepon, modem, wifi router, dan lain-lain.

Semakin tegak paku terhadap dinding, maka semakin mudah paku menusuk tembok.


Pegang palu di dekat kepalanya. Pukul paku dengan pukulan yang ringan. Dengan frekuensi pukulan lebih sering, sekitar 2 sampai 3 pukulan per detik.  


Jika palu dipegang di ujung gagang atau di pangkal gagang, maka paku akan terpukul dengan kuat. Sehingga paku akan bengkok. Dinding bisa retak.

Jika lapisan acian sudah berhasil ditembus, maka paku akan lebih mudah masuk ke dalam tembok.


Terlihat pada foto di atas paku sudah masuk ke dalam tembok sekitar 1.5 cm. Jika terus dipukul palu, maka paku akan masuk lebih dalam lagi. 

Terlihat juga dinding tidak retak karena paku tidak dipukul kuat, tapi frekuensi pukulannya lebih sering. Cara memaku seperti ini bisa juga diterapkan pada paku beton, agar tembok tidak retak.

Trik memaku ini juga bisa dilihat pada video YouTube:


Tembok dengan bata merah biasanya lebih keras, tapi bata merah bisa ditembus paku kayu. Tembok batako dan hebel atau bata ringan mudah ditembus paku kayu.

Paku tidak bisa menembus bagian dinding dan tiang yang dicor. Paku tembok sekalipun juga tidak bisa menembus bagian yang dicor tersebut.

Walaupun paku kayu ditujukan untuk kayu, dan masih bisa digunakan memaku tembok. Tapi di Kalimantan dan Sumatra, terdapat kayu ulin (eusideroxylon zwageri) atau kayu besi yang sangat keras. Sehingga hanya dapat dipaku dengan paku beton.


Friday, April 21, 2023

Roof Steel Frame Earthing Prevents Electrocution

Lightweight steel roof trusses are currently very popular. Because they are easy to build, cheap, strong, and rust resistant. But if there is a leak in the electric power line, for example: being bitten by a mouse, and the wire touching  steel roof trusses. Then the electric current will spread throughout the trusses. Even the electric current flows to the metal roof tiles, if you use these tiles.


One way to minimize the risk if an electric current leak occurs in roof steel, is to discharge the electric current from the frame to the ground, which is called earthing or grounding.

Earthing is actually somewhat different from grounding. Earthing means that the circuit is physically connected to the Earth, i.e. the voltage is Zero Volts to Earth.

Grounding is not physically connected to Earth, but the voltage is Zero Volts to any other point on the circuit. But the term grounding is more popular. Grounding can be a connection to the device body.

If the steel frame is big enough, and the steel surface attached to the wall is large enough, then earthing is usually sufficient. But it will be better and safer, if the earthing is ensured by connecting the steel frame to the electrical conductor, which is embedded in the ground.

Good earthing usually uses copper rod that is planted in the ground. Concrete iron that is planted and cast in concrete pillars, can be used as earthing. In the photo below, you can see the protruding concrete iron at the top end of the concrete pillar. 


The concrete iron (rebar, reinforcing bar, reinforcement bar) that sticks out like in the photo is usually plenty at the top end of the wall. So it can be easily connected to the steel roof truss.

It should be noted that the rebar that will be used as earthing must be properly closed, not located in the bathroom or in other damp places that people often walk through. This is to prevent anyone from being electrocuted in the event of an electric leak.

In the bathroom, there is a risk that the electric current will flow to the wet body of the person in the bathroom, not to the ground. This can be very dangerous.

It is necessary to ascertain whether the rebar is good enough to be used as earthing. You do this by connecting a lamp with an electric cable from the electric grid. In the photo below the lamp used is a 9 watts LED lamp.


In the photo above, the lamp is only connected to a phase (voltage) wire from the electric grid, this wire is black. While the other yellow wire from the lamp is connected to the rebar. If the ground is good, then the lamp will glow brightly. Even though the red (neutral) wire from the grid is not connected to the lamp. The phase wire is an electrical wire that can power on the tester pen's lamp. The phase wire can cause electric shock if touched.

Usually the rebar is covered in dirt, cement, and a bit of surface rust. Clean it with a file, it can also be cleaned with sandpaper.


Connect the roof frame by attaching a wire to one of screws on the roof frame. As in the photo below, the yellow wire is connected to the roof frame.


That yellow wire is connected to the rebar, and secured with a steel plate clamp.


It is recommended that the connection on the rebar be covered with grease, may also be smeared with used oil, or painted with anti-rust paint.. So that it is not exposed to air to prevent oxidation which can cause rust on the rebar and clamp.


If the earthing connection is good. Then the lamp that is grounded on the roof frame can be turned on brightly, like the photo below.


It can be seen the black (voltage) wire from the electric grid connected to the lamp, and the yellow wire from the lamp is connected to the roof steel frame. While the red (neutral) wire from the electric grid is not connected.

This method of earthing with rebar can also be applied for earthing electronic devices such as: televisions (TV), computers, refrigerators, washing machines, amplifiers, air conditioners (AC), radio communications, and various other devices.

If an electric current leak has occurred, when the roof truss is properly grounded, then the electric current in the roof steel frame cannot be detected with a tester pen. If the MCB (Miniature Circuit Breaker) is sensitive, it can be tripped when current leaks into the roof steel frame, but that doesn't always happen.

One way tro test for current leakage is to turn off all electrical loads, such as lights, water pump, air conditioners, refrigerators, rice cookers, electric stoves, TVs, and others. And keep all MCB connected.

If the electric meter is still counting, it means there is a current leak. It would be more accurate to use a clampmeter to measure the electric current flowing in the main cable from the electric pole to the electric meter. There shall be no electric current in the main wire when all loads are off.

If indeed there is an indication of current leakage to the steel frame. Keep all electrical loads off. Then turn off the MCB one by one, while checking whether the electricity meter stops counting. When the electric meter stops counting after the MCB is turned off, then on that MCB line there is a wire that leaks and sticks to the roof steel frame.

Moist soil is usually good for earthing, so earthing conductors can be planted in watery soils such as drains. But drains are usually dirty and can damage the conductor.

Earthing may also be connected to metal water pipes (iron, galvanized steel, copper) embedded in the ground. But still should be kept away from areas that are often passed by people.

Because the roof is grounded, it will also help distribute electrical energy if the roof is struck by lightning.

Apart from earthing, as an effort to prevent electric shock, electrical installations must be kept away from light steel frames. Even if the electrical installation must be attached to steel frame, then the electric cable must be properly insulated, such as using: conduit pipes, twist-on wire connector, and others.

Avoid the main power cable from electric pole being attached to roof steel frame. If there is an electric leak, it will be difficult to cut off the electricity. Because the cable from the pole has not gone through the MCB or fuse. The main power cable must not be covered and hidden, so that it is easy to monitor, prevent damage, and prevent electricity theft.