Matched Content

Sunday, December 20, 2020

Non Contact Hidden Wall Cable Detector By A/C Voltmeter


Alternating Current (A/C) can produce strong radio waves when it is loaded.

And on the contrary, radio wave radiation will cause alternating current, if the wave is caught by an electric conductor or antenna.

A/C voltmeter can detect the presence of alternating current without the need to touch the current source (non contact).

So that the A/C volt tester can be used to trace electrical cables hidden in walls or other enclosed parts.

This science project can easily be done at home in your spare time or at Sunday morning. It's easy because without the need for additional electronic circuits, as follows:

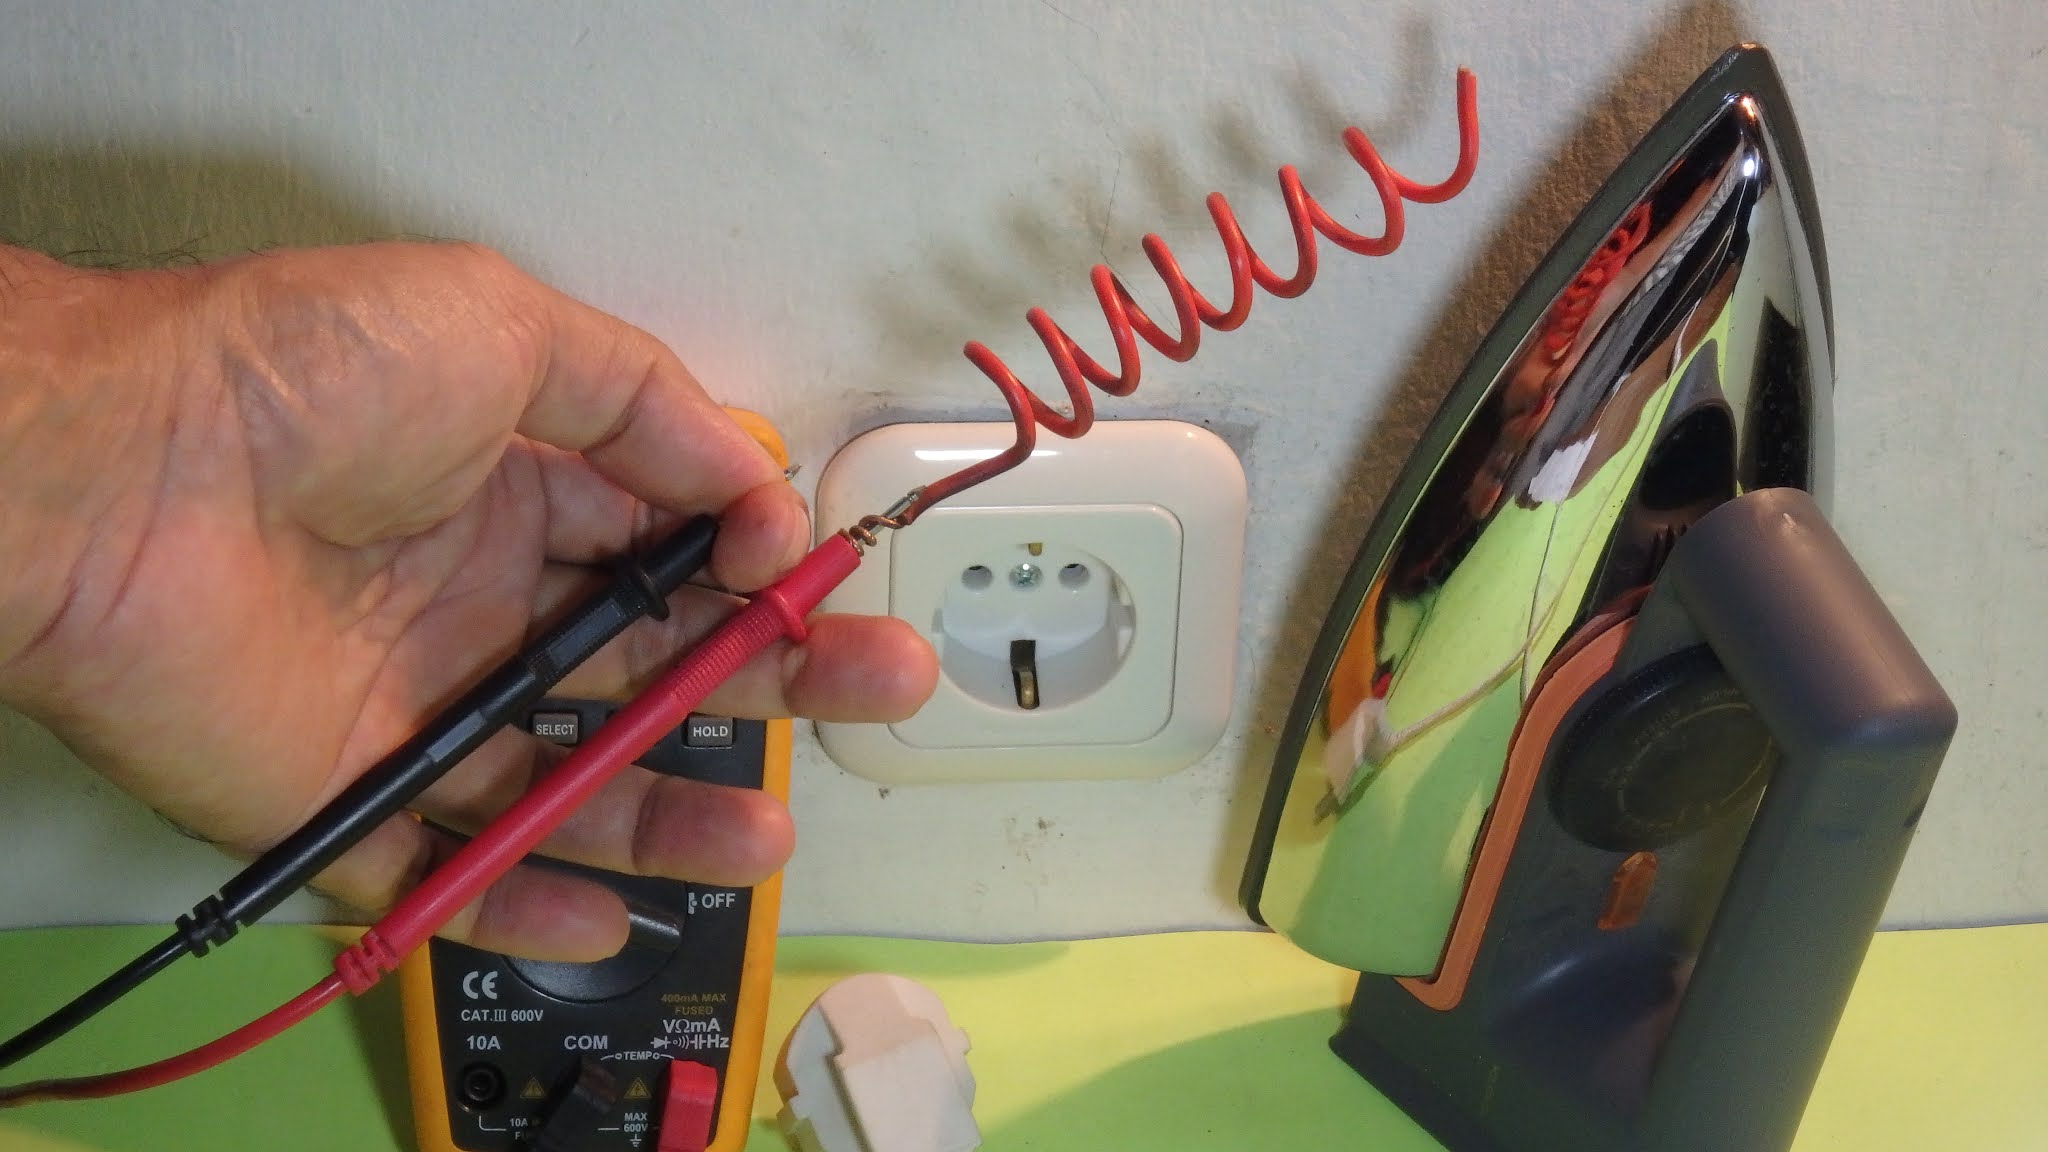
Prepare a digital multitester that has an A/C volt tester, with 1 mV (milli Volt) sensitivity.

One probe is pinched with fingers, as earth or ground.


Another probe is connected to an antenna, made of a single electrical wire, about 50 cm long. The longer the antenna, the more sensitive it is.

The antenna wire is coiled, so that it is not too long. If it is straight and long, it will catch radio waves from a large area, making it less accurate to detect the position of hidden electric cables.

The coil diameter is about 1-2 cm. If the diameter too small, it will block the radio waves. Because the inductance will increase.

The following YouTube video shows how this non contact detector works.


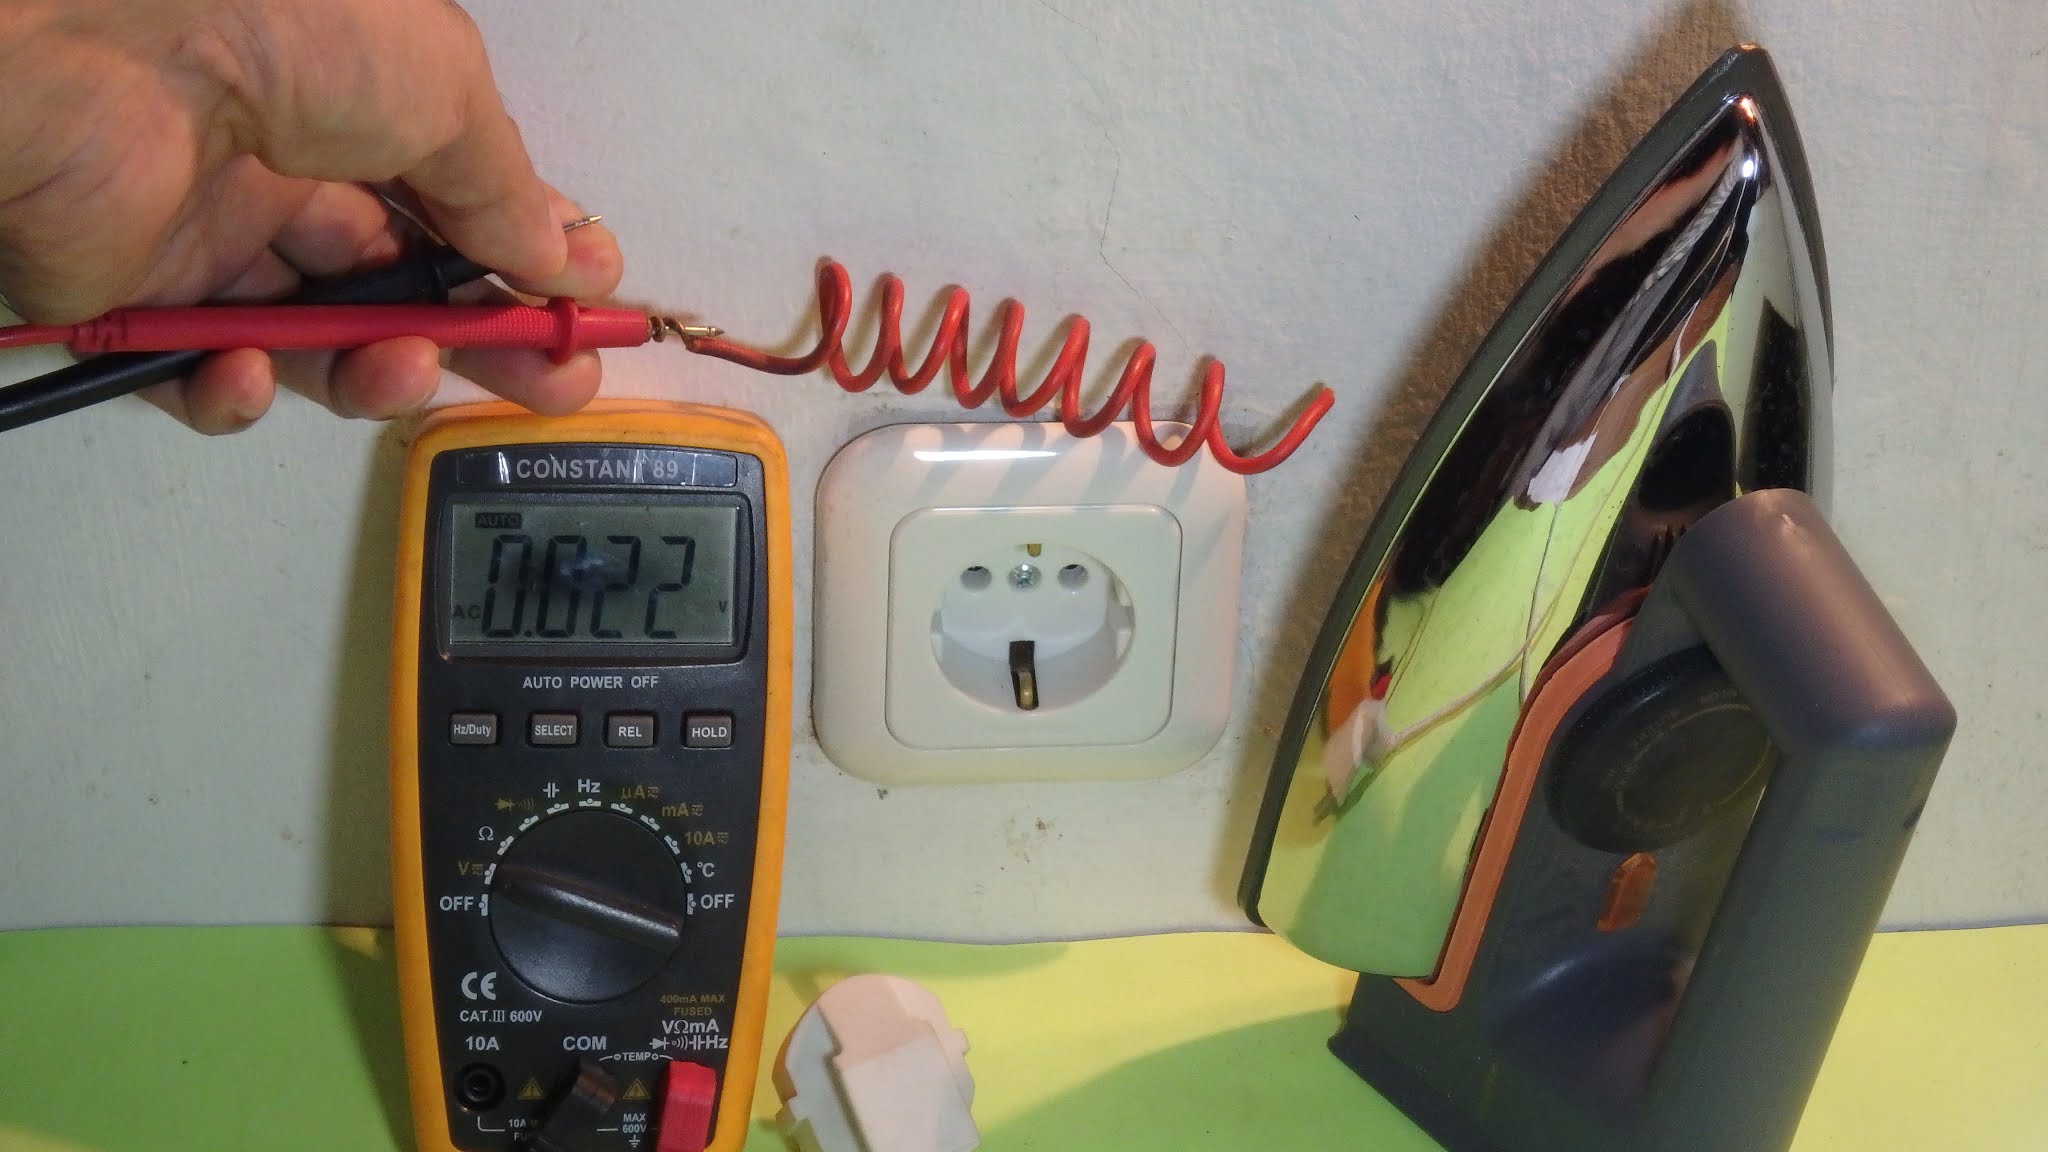
On a wall far from the power line, the voltmeter will read as low as 0.010 vac.

If the antenna is held close to a wall which contains hidden power lines. Then the voltmeter will read about 0.020 volts.


If a clothes iron is connected the that hidden electric wire, the meter will read higher to about 0.5 volts. In the photo below you can see the clothes iron cable is connected, and the iron light turns orange.


If the antenna is closer to the cable that is more open. Then the voltage will be even higher, it can be above 1.4 volts.


If there are a lot of metals or electrical conductors around the cable, such as: zinc, aluminum, brass, copper, tin, lead, iron or steel frames, nickle, chrome, silver and gold plating, and so on. The detection will be less accurate.


Friday, November 20, 2020

Voltmeter Deteksi Kabel Tersembunyi Di Dinding Non Kontak


Listrik arus bolak-balik (Alternating Current, A/C) dapat menghasilkan gelombang radio yang kuat jika diberi beban.

Dan sebaliknya radiasi gelombang radio akan menimbulkan arus bolak-balik, jika gelombang tersebut tertangkap oleh konduktor listrik atau antena.

A/C voltmeter dapat mendeteksi adanya arus bolak-balik tanpa perlu menyentuh sumber arus (non contact).

Sehingga A/C volt tester dapat digunakan untuk melacak kabel listrik yang tersembunyi di dalam dinding atau bagian tertutup lainnya.

Proyek sains ini dapat dengan mudah dikerjakan di rumah di saat senggang atau di Minggu pagi. Mudahnya karena tanpa perlu rangkaian elektronik tambahan, sebagaimana berikut:

Siapkan digital multitester yang mempunyai A/C volt tester, dengan sensitivitas sampai sekecil 1 mV (mili Volt).

Satu probe dijepit dengan jari, sebagai masa atau bumi (ground).


Satu probe lagi terpasang antena, terbuat dari kabel listrik tunggal, sepanjang sekitar 50 cm. Semakin panjang antena akan semakin sensitif.

Kabel antena itu digulung agar tidak terlalu menjulur panjang. Jika menjulur maka akan menangkap gelombang radio dari area yang luas, sehingga kurang akurat mendeteksi posisi kabel tersembunyi.

Diameter gulungan sekitar 1-2 cm. Jika gulungan terlalu kecil diameternya akan menghambat gelombang radio. Karena induktansi akan meningkat.

Video YouTube berikut memperlihatkan cara kerja detektor non kontak ini.


Pada dinding yang jauh dari kabel listrik, voltmeter akan terbaca sangat rendah bisa di bawah 0,010 vac.

Jika antena didekatkan ke dinding yang mengandung kabel listrik tersembunyi. Maka pada voltmeter akan terbaca sekitar 0,020 volt.
         

Jika kabel listrik tersebut diberi beban setrika, maka akan terbaca lebih tinggi sekitar 0,5 volt. Pada foto di bawah terlihat kabel setrika tersambung, dan lampu setrika menyala oranye.
        

Jika antena didekatkan dengan kabel yang lebih terbuka. Maka tegangan akan jadi lebih tinggi lagi, dapat menjadi di atas 1,4 volt.


Jika terdapat banyak logam atau penghantar listrik di sekitar kabel, seperti: seng, aluminium, kuningan, tembaga, timah, timbal, rangka besi atau baja, nikel, krom, sepuhan perak dan emas, dan sebagainya. Deteksi akan kurang akurat.


Tuesday, October 20, 2020

Mosquito Fogger Machine Coil Steam Test


Fogging machine is a steam spraying machine, commonly it is used to eradicate mosquito, plant pest, cockroach, and various insect pests. It can also be used to smoke rat hole.

The coil in this machine functions as a steam boiler to evaporate insecticide or pesticide. The heat will produce high pressure steam that squirts into the air and into tight space where insects hide.

To be able to evaporate pesticide, it takes a large amount of heat. Heat is generated by a gas torch. Estimated power requirement is up to 1,000 watts. Therefore it is difficult to use an electric heater, because it will require a large battery.

Fogger with fire torch does have a fire risk.  If not careful, and fogger sprays near flammable objects.

If using the house electricity, the house must have a big electric power. Also it needs a long cable so that the fogger can spray all over the house and yard.

As seen in the photo above.  This prototype fogging machine is designed with a nozzle in a low position. The goal is to easily spray into: hole in the ground, sewer, gutter, culvert, rat hole, and so on.

The coil is made of iron / steel pipe.  It is not made of copper pipe.  Indeed copper is more heat resistant.  But copper is not strong or soft, so it is easy to leak.

The pesticide pump is placed on top of the machine handle.  So that the machine can be operated easily with only one hand.

The position of the gas container is at the back. To keep away from gas torch fire. So as to minimize the risk in the event of a gas leak. The gas used is a mixture of butane and propane.  Available on the market, in the size of 235 gram container with brand name: Tokai, Hi-Cook, Culinaria, Supercook, Wonderfuel, Winn Gas, Hans Butane, Top Cook, Campingaz, GoSystem, Pro Power, Coleman, Robinson and others.  This canned gas is commonly used for camping gas stoves, portable stoves, mini stoves, filling lighters, stove lighters, welding, soldering, brazing, and others.

The following YouTube video shows the steam power when testing the coil.


You can see a red plastic flag flying as sprayed by steam. The flag is 1.8 meters from coil pipe muzzle, or about 6 pieces of floor tiles measuring 30 cm. The steam moves for more than 2 meters.  The steam gushes vigorously not once, but several times.

The power of the steam burst is needed to reach hiding places of insects. As it is in closed gutters, in culverts, dense leaves, shrubs, and so on.

Also see the following video when the fogger bursts out fire when spraying SAE40 oil.


Sunday, September 20, 2020

Coil Mesin Fogging Mini Pembasmi Nyamuk


Mesin fogging adalah mesin penyemprot uap, biasa digunakan untuk membasmi nyamuk, hama tanaman, kecoa, dan berbagai hama serangga. Bisa juga digunakan untuk mengasapi lubang tikus.

Coil (koil) pada mesin ini berfungsi sebagai ketel uap (steam boiler) untuk menguapkan insektisida atau pestisida. Panas akan menghasilkan uap bertekanan tinggi yang menyemprot ke udara dan masuk ke ruang sempit di mana serangga bersembunyi.

Untuk dapat menguapkan pestisida, dibutuhkan daya panas cukup besar. Panas dihasilkan oleh obor gas. Estimasi mencapai 1.000 watt daya yang dibutuhkan. Oleh karena itu sulit menggunakan pemanas listrik, karena akan butuh baterai atau aki yang besar.

Fogger dengan obor api memang mempunyai resiko kebakaran. Jika tidak hati-hati, dan menyemprot ke dekat benda yang mudah terbakar.

Jika menggunakan listrik rumah, maka harus mempunyai daya listrik PLN yang besar. Juga butuh kabel yang panjang agar dapat menyemprot ke seluruh penjuru rumah dan pekarangan.


Sebagaimana terlihat pada foto di atas. Prototipe mesin pengabut ini didesain dengan pipa semprot (nozzle) dengan posisi rendah. Tujuannya agar mudah menyemprot ke: lubang di tanah, selokan air, gorong-gorong, lubang tikus, dan lain-lain.

Koil terbuat dari gulungan pipa besi / baja. Bukan terbuat dari pipa tembaga. Memang tembaga lebih tahan panas. Tapi tembaga kurang kuat atau lunak, sehingga mudah bocor.

Pompa pestisida diletakkan di atas gagang mesin. Agar mesin dapat dioperasikan dengan mudah dengan hanya satu tangan.

Posisi kaleng gas berada paling belakang. Agar jauh dari api obor gas. Sehingga memperkecil resiko jika terjadi kebocoran gas. Gas yang digunakan adalah campuran butana dan propana. Tersedia di pasaran ukuran kaleng 235 gram merk Tokai, Hi-Cook, Culinaria, Supercook, Wonderfuel, Winn Gas, Hans Butane, Top Cook, Campingaz, GoSystem, Pro Power, Coleman, Robinson, dan lain-lain. Gas kaleng ini biasa digunakan untuk gas kompor camping, kompor portable, kompor mini, mengisi korek api / korek gas, pemantik kompor, las, solder, patri, brazing, dan lain-lain.

Video YouTube berikut memperlihatkan daya semburan uap saat pengujian koil.


Terlihat bendera  plastik merah berkibar terkena semburan uap. Bendera tersebut berjarak 1,8 meter dari ujung pipa koil, atau sekitar 6 buah keramik lantai ukuran 30 cm. Semburan uap masih terus bergerak lebih dari 2 meter. Uap menyembur kuat tidak hanya sekali, tapi beberapa kali.

Kekuatan semburan uap dibutuhkan untuk menjangkau tempat terpencil persembunyian serangga. Seperti dalam selokan tertutup, dalam gorong-gorong, daun lebat, semak belukar, dan lain-lain.

Lihat juga video berikut saat fogger menyemburkan api ketika menyemprotkan oli SAE40 .


Monday, July 20, 2020

Perpanjang STNK Online Jakarta dan Nasional


Aplikasi Samsat Online Nasional (Samolnas) guna membayar pajak kendaraan dan validasi STNK tanpa perlu datang ke kantor Samsat.

Biasanya saya membayar pajak kendaraan langsung di kantor Samsat Jakarta Selatan di jalan Gatot Subroto. Disini ada fasilitas Drive Thru. Kendaraan cukup antre dan menyerahkan berkas di loket pertama, selanjutnya pembayaran, dan sudah selesai. 

Kadang saya datang langsung ke Samsat Outlet Lantai 3A Blok M Square, jalan Melawai Raya, Kebayoran Baru.

Karena pandemi corona virus atau covid 19, kami dilarang oleh ketua RT (Rukun Tetangga) untuk keluar rumah jika tidak benar-benar perlu. Maklum lingkungan kami termasuk zona merah.

Sebagaimana disarankan oleh media massa untuk membayar pajak mobil dan sepeda motor melalui internet. Saya coba mengunduh dari Google Playstore aplikasi Samsat Online Nasional pada smartphone Android Samsung dan berfungsi dengan baik dan gampang.

Pada awalnya  hanya berlaku pada beberapa daerah di Jawa dan Sumatra. Sejak tahun 2019, perpanjang STNK online dengan aplikasi Samolnas sudah berlaku di seluruh Indonesia.


Syarat Bayar Pajak Motor Online
Sebagaimana dikutip dari NTMC Polri, berikut ini adalah beberapa syarat bayar pajak kendaraan bermotor yang bisa dilayani oleh Samsat online:

Untuk dapat melakukan pembayaran pajak online, kendaraan bermotor harus dalam keadaan pengesahan STNK penuh selama 1 tahun.

Kendaraan bermotor sedang tidak dalam keadaan ganti STNK atau ganti plat nomor.

Kendaraan bermotor harus disertai dengan surat lengkap, seperti BPKB, KTP pemilik asli, dan STNK.

Kendaraan bermotor sedang tidak dalam keadaan terlambat pajak lebih dari 1 tahun.

Syarat bayar pajak motor online yang terakhir adalah kendaraan bermotor tidak berkeadaan hilang atau rusak, lapor jual, laka, dan tersangkut kriminal.

Data yang dibutuhkan adalah:
Nomor polisi, misal B 109 GER
NIK (Nomor Induk Kependudukan) atau nomor Kartu Tanda Penduduk (KTP)
Nomor rangka 5 digit terakhir
Kontak (nomor ponsel)
E-mail, tidak wajib

Kemudian rincian dan total biaya pajak kendaraan akan muncul. Kode bayar (billing code) akan diterbitkan dan berlaku selama 2 jam.

Pembayaran saya lakukan di atm BCA, dengan menggunakan kode bayar yang telah diterbitkan oleh aplikasi ini. Pastikan dulu bahwa mesin ATM dapat mencetak struk, sebagai bukti bayar. 

Jika pembayaran berhasil maka status pada aplikasi akan tertulis dibayar. Aplikasi juga akan menerbitkan E-STNK. 

Saya sempat mencoba membayar via internet dengan klikbca, tapi tidak bisa. Pembayaran juga dapat dilakukan via modern channel atau ecommerce seperti bukalapak, traveloka, juga minimarket seperti Indomaret dan Alfamart, dan lain-lain.

Pembayaran juga bisa dilakukan melalui teller bank, dan struknya bisa dijadikan bukti bayar. Bank lainnya diantaranya adalah: BNI, BRI, Mandiri, BTN, BJB (Bank Jabar), CIMB Niaga, Permata Bank, Bank DKI, dan lain-lain.


Tanda bukti pelunasan kemudian akan dikirim ke alamat rumah, pengalaman saya sekitar 3 minggu. Agak lama mungkin karena petugas terkendala pandemi covid-19. Amplop surat seperti pada foto di atas. Sticker pengesahan juga dikirim. 


Pada foto di atas tampak sticker pengesahan, hati-hati bisa terjatuh dan hilang saat buka amplop. 


Selanjutnya bisa ditempel sendiri di kotak pengesahan pada STNK, sebagaimana terlihat di foto di atas.

Jika alamat pengiriman tidak sama dengan KTP, maka bisa dilaporkan untuk disesuaikan.


Saturday, July 11, 2020

Mini Thermal Mosquito Fogger Machine Gas Powered


This Krisbow 2000G fogging machine is practically used for mosquito fogging, and it is suitable to be used at narrow spaces.

This machine has 2 tanks.  The large orange tank is a container for chemical fluids that kill mosquitoes and other insects.

A small semi-transparent white tank is a water bottle for rinsing the heating pipe.  Insect-killing chemical can leave sediment in a spiral-shaped heating pipe.  If there is a lot of sediment then the pipe becomes clogged. And it is difficult to clean it because of the spiral shape of the pipe.


The photo above is the right side view of this Krisbow fogger.  There was a small semi-transparent bottle filled with green dishwashing soap water.  This soapy water will later be used to rinse the pipe as soon as the fogger has been used, so as to prevent deposits from chemicals clogging the pipe.

Orange tank is used store insecticidal chemicals (pesticides, insecticides).  Maximum capacity of 2 liters or 2000 grams.

As shown in the photo, the gas cylinder or gas can is still not installed yet.  The gas cylinder must be removed if the fogger is not used,  to prevent gas leakage.

On the right side of the fogger, there is a red button to provide the electric spark to ignite the gas. If this button is pressed, an electric spark will come out under the gas pipe in the fogger's muzzle, so that the gas will be ignited.

Another red knob is at the back of fogger, above the gas cylinder.  If this red knob is turned to the left, it will open the gas flow.  The more it rotates to the left, the greater the gas fire will be.


The photo above shows the left side of the fogger. The gas cylinder is mounted already at the back of the fogger. The fogger's snout is smoldering because of the gas fire. Fogger is ready to use.

Note that the gray tap is set in a vertical position, so that insecticide can flow from inside the orange tank up towards the fogger's snout

The insecticide pump is activated by squeezing the blue handle on the top of fogger. So that the insecticide will rise out of the orange tank, then it evaporates in a spiral heating pipe and spray as smoke.


In the photo above, the rinse water bottle is turned over and slightly kneaded so that the soapy water comes out to rinse the heating pipe.  Actually this can be done with a rinse pump at the back of fogger. But sometimes the pump is not effective. Note the gray faucet on the left side of the fogger, the faucet is set in a horizontal position so that soapy water flows from the back of fogger into the heating pipe in the fogger's muzzle.


Fogger can also be rinsed with tap water. Photo above shows the fogger is rinsed with tap water. The small bottle is removed, then the bottle hose is connected to the water tap via the orange hose. Seen at the left side of fogger, the gray tap is set in the horizontal position. If the water tap is opened, tap water will flow into the fogger, through a small rinse hose, heating pipe, and out of the fogger's muzzle.

Flushing also needs to be done on the vertical pipe in the insecticide tank. It can be done by filling clean water into orange tank. Or by preparing clean water in a bucket, and the orange tank is removed.


The photo above shows the fogger with the insecticide tank that has been removed. Note the vertical pipe where there is an insecticide pump, that pipe is dipped in a bucket of water. The insecticide pump is then activated so that the water from the bucket is pumped up. Then water exits through the heating pipe in the fogger's muzzle. Note the gray tap position is set in the vertical position.

Flushing must be done immediately after the fogger has finished smoking, do not wait a few minutes. Make sure the rinse water that comes out of the fogger's snout is clear, indicating there is no insecticide left. This is to prevent deposits from chemicals clogging the fogger pipe.

From experience, usually maximum fogger working time is about 1 hour. Then immediately it is rinsed to ensure no sediment in the heating pipe. Furthermore fogger can be used for another 1 hour. Insecticide consumption is around 1 liter per hour.


Thursday, June 11, 2020

Pembasmi Nyamuk Mini Fogger Krisbow 2000G


Mesin fogging atau fogger ini praktis digunakan untuk pengasapan nyamuk, dan bisa masuk ke ruang sempit.

Mesin ini mempunyai 2 buah tangki. Tangki besar warna oranye adalah wadah cairan kimia pembasmi nyamuk dan serangga lainnya.

Tangki kecil warna putih semi transparan adalah botol air untuk membilas pipa pemanas. Cairan kimia pembasmi serangga dapat meninggalkan endapan di dalam pipa pemanas yang berbentuk spiral. Jika banyak endapan maka pipa jadi tersumbat, dan sulit membersihkannya karena bentuk spiral pipa.


Foto di atas adalah tampak samping kanan dari fogger Krisbow ini. Terlihat ada botol kecil semi transparan yang berisi air sabun pencuci piring warna hijau. Air sabun ini nantinya akan digunakan untuk membilas pipa segera setelah fogger selesai digunakan, agar mencegah endapan dari zat kimia menyumbat pipa.

Tangki oranye untuk menampung zat kimia pembasmi serangga (pestisida, insektisida). Kapasitas maximal 2 liter atau 2000 gram.

Tampak pada foto tabung gas atau kaleng gas masih belum terpasang. Tabung gas memang harus dilepas jika fogger tidak digunakan. Untuk mencegah kebocoran gas.

Pada sisi kanan fogger, tampak tombol merah pemantik bunga api listrik untuk menyalakan gas.  Jika tombol ini ditekan, maka timbul percikan api listrik di bawah pipa gas di moncong fogger, sehingga api gas akan menyala.

Kenob merah lainnya ada di belakang fogger, di atas tabung gas. Jika kenob merah ini diputar ke kiri akan membuka aliran gas. Semakin diputar ke kiri maka api gas akan semakin besar.


Foto di atas memperlihatkan sisi kiri fogger. Tampak tabung gas sudah terpasang di belakang fogger. Moncong fogger sudah membara karena api gas. Fogger siap digunakan.

Perhatikan keran abu-abu disetel pada posisi vertikal, agar cairan pestisida bisa mengalir dari dalam tangki oranye naik menuju moncong fogger.

Pompa insektisida diaktifkan dengan meremas pegangan warna biru di atas fogger. Sehingga insektisida akan naik ke luar dari tangki oranye, lalu menguap di pipa pemanas spiral dan menyembur sebagai asap.


Pada foto di atas, botol air pembilas dibalik dan sedikit diremas agar air sabun keluar membilas pipa pemanas. Sebetulnya hal ini bisa dilakukan dengan pompa pembilas yang ada di belakang fogger. Tapi kadang pompa tersebut kurang efektif. Perhatikan keran abu-abu di samping kiri fogger, keran disetel pada posisi horizontal agar air sabun mengalir dari belakang fogger ke dalam pipa pemanas di moncong fogger.


Fogger juga dapat dibilas dengan air keran. Foto di atas memperlihatkan fogger dibilas dengan air keran. Botol kecil dilepas, lalu selangnya dihubungkan dengan keran air via selang oranye Terlihat di samping kiri fogger, keran abu-abu disetel pada posisi horizontal. Jika keran air dibuka, maka air keran akan mengalir ke dalam fogger, melalui selang kecil pembilas, pipa pemanas, dan keluar dari moncong fogger.

Pembilasan juga perlu dilakukan pada pipa vertikal di dalam tangki insektisida. Caranya dengan mengisi tangki oranye dengan air bersih. Atau menyiapkan air bersih dalam ember., dan tangki insektisida dilepas.


Foto di atas memperlihatkan fogger dengan tangki insektisida yang sudah dilepas. Pipa vertikal dimana terdapat pompa insektisida, dicelup ke dalam ember air. Pompa insektisida lalu digerakkan agar air dari ember terpompa naik, lalu keluar melalui pipa pemanas di moncong fogger. Perhatikan bahwa posisi keran abu-abu disetel pada posisi vertikal.

Pembilasan harus segera dilakukan setelah fogger selesai pengasapan, jangan tunggu beberapa menit. Pastikan air bilas yang keluar dari moncong fogger  jernih, menandakan tidak ada insektisida yang tersisa. Agar mencegah endapan dari zat kimia menyumbat pipa fogger.

Dari pengalaman, biasanya fogger maximal bisa bekerja 1 jam. Lalu segera dibilas agar tidak banyak endapan di pipa pemanas. Selanjutnya fogger bisa digunakan 1 jam lagi. Konsumsi insektisida sekitar 1 liter per jam.


Tuesday, May 12, 2020

Home Well Pump Tank Leaks, Modify With Hose


National deep well water pump (jet pump) was made in the 1980s.  It is rusty and porous around the outlet. This water pump has no longer used an automatic system based on pressure, so the function of the pressure tank is not too important.  The pump is controlled by a switch, that is in the reservoir water tank.

Read also how to fix pressure washer loses pressure when trigger pulled.

Water pump pressure tank serves to contain water, and keep water pressure constant.  Without this tank, the water pump will start and stop quickly. Usually occurs if not using a reservoir water tank. The pump electric motor draws a large electric current at start.  If the pump starts and stops repeatedly and quickly (short cycling), and lasts for a long time, there is a risk of overheating.  Pump cooling fans are usually only effective at relatively high rotation, not at start.  So the pump can be overheated, and the pump may be burnt.  Electricity costs will also be high when the pump turns on and off repeatedly.

The following are the steps to modify a rusted water pump tank, modified with a hose.  The equipments used are only simple basic tools such as: plate shears, hacksaw, screwdrivers, spanners, and other tools for removing and re-installing the pump.

If all tools and materials or components are available, this work can be completed in one day or around 8 hours. Materials required by this National jet pump are:
  • hose 1 inch diameter, about 60 cm long
  • hose clamp 2 pieces, stainless steel for the above hose
  • PVC pipe adapter 1/2 to 1 inch 1 piece
Material can differ according to pump type and conditions in the field.

It is recommended that the pump machine is removed from the tank, before the modification work begins. So that it is not difficult to position the tank body.

The following YouTube video also shows this work procedure.


The hose is intentionally tied with a clamp, so that it is easy to remove if the pump will need to be repaired later. If using a PVC pipe instead of the hose, the pipe must usually be glued, so the pipe must be cut if it is removed later.  In addition, the hose can be purchased partially, according to the required size. While the PVC pipe must be purchased one full length, it cannot be bought partially, so the rest pipe will be wasteful.


Cut out the rusted tank part, like the photo above.  Next enlarge the hole with a hacksaw, so that it will be easy to cut the pipe in the tank.


Enlarge the hole with a hacksaw, so that later it will be easy to saw the output pipe in the tank.  In the photo above, the hole size is around 12 x 20 cm.


The output pipe is connected to the pump, this pipe needs to be shortened. So that the hose can be curved smoothly. As can be seen in the photo above, the inside detail of the tank, the output pipe is about 5 cm from the top of the tank base which is curved.


Because the space is narrow, the handle of a hacksaw is difficult to use. Hacksaw can be wrapped with a hose as a handle.


Cut the output pipe to become shorter with a hacksaw.


Shown in the photo above the shortened output pipe. Pipe is hanging about 12 cm from the bottom of the tank. So that enough space for the hose to bend smoothly.


The 1 inch hose must be widened a bit, so the hose can be fitted to output pipe. Heat the cut pipe and the hose mouth. Then insert the hot cut pipe into the hose to expand that hose.


The hose must also be slightly widened to fit the 1/2 inch PVC adapter. The pipe that connect to water reservoir is 1 inch in size. So it needs a PVC adapter 1/2 to 1 inch.

.

Fit the hose to the pump output pipe, lock it with hose clamp. Fit the other end of the hose to the network pipe, or to the water reservoir, via 1/2 to 1 inch PVC adapter.

Hose installation can be easier with lubricant such as used oil or grease. Lubricant also helps to close small gaps to avoid leak.

Block the small hose that lead to AVC (Air Volume Control), because it is not used anymore.


In the photo above, on the pump impeller housing,  the AVC line is blocked with screw and glued.

AVC functions to adjust the volume of air in the pressure tank.  If there is too little air in the tank, the pump will be short cycling.  If there is too much air, there will be less water in the tank.


The power cable on the pressure switch can also be disconnected and connected directly to the electric motor, no longer via pressure switch.  Shown in the photo below 2 cables from the switch have been disconnected.


The wire from the electric grid is connected directly to the pump motor.

The following photo shows the hose installation to water reservoir line, it is seen from the top of the pump. This modification work has been completed, the water pump is ready to work again.


Also seen in the photo above, the pump is based on rocks covered ground, and the pump is laid onto bricks foundation. If the pump leaks, the water can immediately seep into the ground. If it is cemented, the leaked water can accumulate causing rust. The water can even cause an electric short, if there is too much water leaking. Rocks are cheaper than cement, it can also prevent rat nesting.


Sunday, April 12, 2020

Tangki Pompa Air Keropos, Modifikasi Pakai Selang


Tangki atau tabung pompa air jet pump National, buatan tahun sekitar 1980 an. Sudah berkarat dan keropos di sekitar saluran keluar (outlet, output). Pompa air ini tidak lagi memakai sistem automatis berdasarkan tekanan, sehingga fungsi dari tangki airnya tidak terlalu penting. Pompa dikontrol dengan saklar yang ada pada tandon penampung air.

Tangki tekanan atau pressure tank pada pompa air berfungsi menampung air, dan menjaga tekanan air agar konstan. Tanpa tangki ini pompa air akan hidup dan mati dengan cepat. Biasanya terjadi jika tidak menggunakan tandon penampung air. Motor listrik pada pompa menarik arus listrik yang besar di saat start. Jika pompa hidup dan mati berulang-ulang dengan cepat (short cycling), dan berlangsung dalam waktu yang lama, maka beresiko pompa kepanasan. Kipas pendingin pompa biasanya hanya efektif pada putaran relatif tinggi, bukan pada saat start. Sehingga pompa bisa menjadi terlalu panas, dan pompa dapat terbakar. Ongkos pemakaian listrik juga akan tinggi di saat pompa hidup-mati berulang-ulang.

Baca juga cara bersihkan pompa steam listrik tersumbat kotoran.

Berikut ini adalah langkah-langkah modifikasi tangki pompa air yang keropos, diganti dengan selang. Peralatan yang digunakan hanyalah alat sederhana seperti: gunting pelat, gergaji besi, obeng, kunci pas, dan perkakas lainnya untuk melepas dan memasang pompa kembali.

Jika semua peralatan dan material / komponen tersedia, pekerjaan ini dapat diselesaikan dalam satu hari atau sekitar 8 jam. Material atau komponen yang dibutuhkan oleh jet pump National ini adalah:
  • selang 1 inci panjang sekitar 60 cm
  • klem plat 2 buah, stainless steel untuk selang di atas
  • sok PVC tipe adaptor 1/2 ke 1 inci 1 buah
Material dapat berbeda sesuai dengan jenis pompa dan kondisi di lapangan. Sebaiknya mesin pompa dilepas dari tangki sebelum pekerjaan modifikasi dimulai, agar tidak kesulitan memposisikan bodi tangki.

Video YouTube berikut juga memperlihatkan prosedur pekerjaan ini.


Selang sengaja diikat dengan klem agar mudah melepas jika nantinya pompa butuh perbaikan lagi. Jika menggunakan pipa PVC menggantikan selang, pipa biasanya harus dilem, sehingga pipa harus dipotong jika nantinya akan dilepas. Selain itu, selang bisa dibeli ketengan atau sebagian, sesuai ukuran yang dibutuhkan. Sedangkan pipa PVC harus dibeli satu batang, tidak bisa diketeng, sehingga sisanya akan mubazir.


Gunting bagian yang keropos, sebagaimana foto di atas. Selanjutnya perbesar lubang dengan gergaji besi, agar mudah memotong pipa di dalam tangki.


Perbesar lubang dengan gergaji besi, agar nantinya mudah untuk menggergaji pipa output di dalam tangki. Pada foto di atas, ukuran lubang sekitar 12 x 20 cm.


Pipa output yang terhubung ke pompa perlu dipendekkan agar belokan selang tidak terlalu patah sehingga selang menyempit. Tampak pada foto di atas detail bagian dalam tangki, pipa output berjarak sekitar 5 cm dari puncak dasar tangki yang berbentuk melengkung.


Karena ruangan yang sempit, maka gagang gergaji besi sulit digunakan. Gergaji besi dapat dibungkus dengan selang sebagai pegangan.


Potong pipa output agar lebih pendek dengan gergaji besi.


Tampak pada foto di atas pipa output yang sudah dipendekkan. Tinggi pipa jadi sekitar 12 cm dari dasar tangki. Sehingga cukup ruang untuk selang berbelok dengan halus.


Selang 1 inci harus dilebarkan sedikit agar pipa output pompa bisa masuk. Panaskan potongan pipa dan mulut selang. Lalu masukkan potongan pipa panas ke mulut selang untuk melebarkan mulut selang.


Selang juga harus agak dilebarkan agar pas dengan diameter luar sok PVC 1/2 inci. Pipa yang menuju toren air berukuran 1 inci. Sehingga dibutuhkan sambungan pipa atau sok tipe adaptor 1/2 ke 1 inci
.

Pasang selang pada ujung pipa output pompa, kunci dengan klem plat. Pasang ujung selang lainnya pada pipa jaringan, atau ke tandon air, melalui sok PVC 1/2 ke 1 inci.

Pemasangan selang dapat dipermudah dengan pelumas seperti oli bekas, atau gemuk (grease). Pelumas juga membantu menutup celah kecil agar tidak merembes.

Sumbat selang kecil yang menuju AVC (Air Volume Control, kontrol volume udara), karena sudah tidak dipakai lagi.


Pada foto di atas, pada rumah impeler (kipas) pompa, terlihat saluran menuju AVC disumbat dengan sekrup dan dilem. AVC berfungsi mengatur volume udara di dalam tangki. Jika udara terlalu sedikit dalam tangki, maka pompa sering hidup mati. Jika udara terlalu banyak, maka air di tangki jadi sedikit.

Kabel listrik pada pressure switch (saklar tekanan) juga bisa dilepas dan disambung langsung ke motor listrik, tidak melalui switch lagi. Tampak pada foto di bawah 2 kabel dari switch sudah terputus.


Kabel dari jaringan listrik disambung langsung ke kabel menuju motor pompa.

Foto berikut memperlihatkan pemasangan selang ke saluran ke tandon air terlihat  dari tampak atas pompa. Pekerjaan modifikasi ini sudah selesai, pompa air siap bekerja kembali.


Tampak juga pada foto di atas, dasar pompa adalah tanah yang ditutup batu split, Dan pompa diberi landasan batu bata. Hal ini agar jika terjadi kebocoran pompa, maka air dapat segera meresap ke dalam tanah. Jika disemen, maka air bocoran dapat terkumpul sehingga menyebabkan karat, bahkan bisa membuat pompa korslet jika terlalu banyak air tergenang. Batu split lebih murah dari semen, juga dapat mencegah tikus bersarang.

Baca juga cara bersihkan pompa steam listrik tersumbat kotoran.