Matched Content

Wednesday, December 21, 2022

Simple Homemade Outdoor Indoor TV Antenna


Antenna can be easily made using materials commonly found at home. This antenna can be connected to TV and radio, also good for digital TV. The antenna discussed in this article uses a single copper electrical cable, with a copper diameter of about 1.5 mm. No need to buy a new cable, used cable can still be used.

In principle, all electrical conductors can be used as antenna to capture radio wave signals or electromagnetic waves. Electrical conductors include: copper, brass, iron, steel, aluminum, and others.

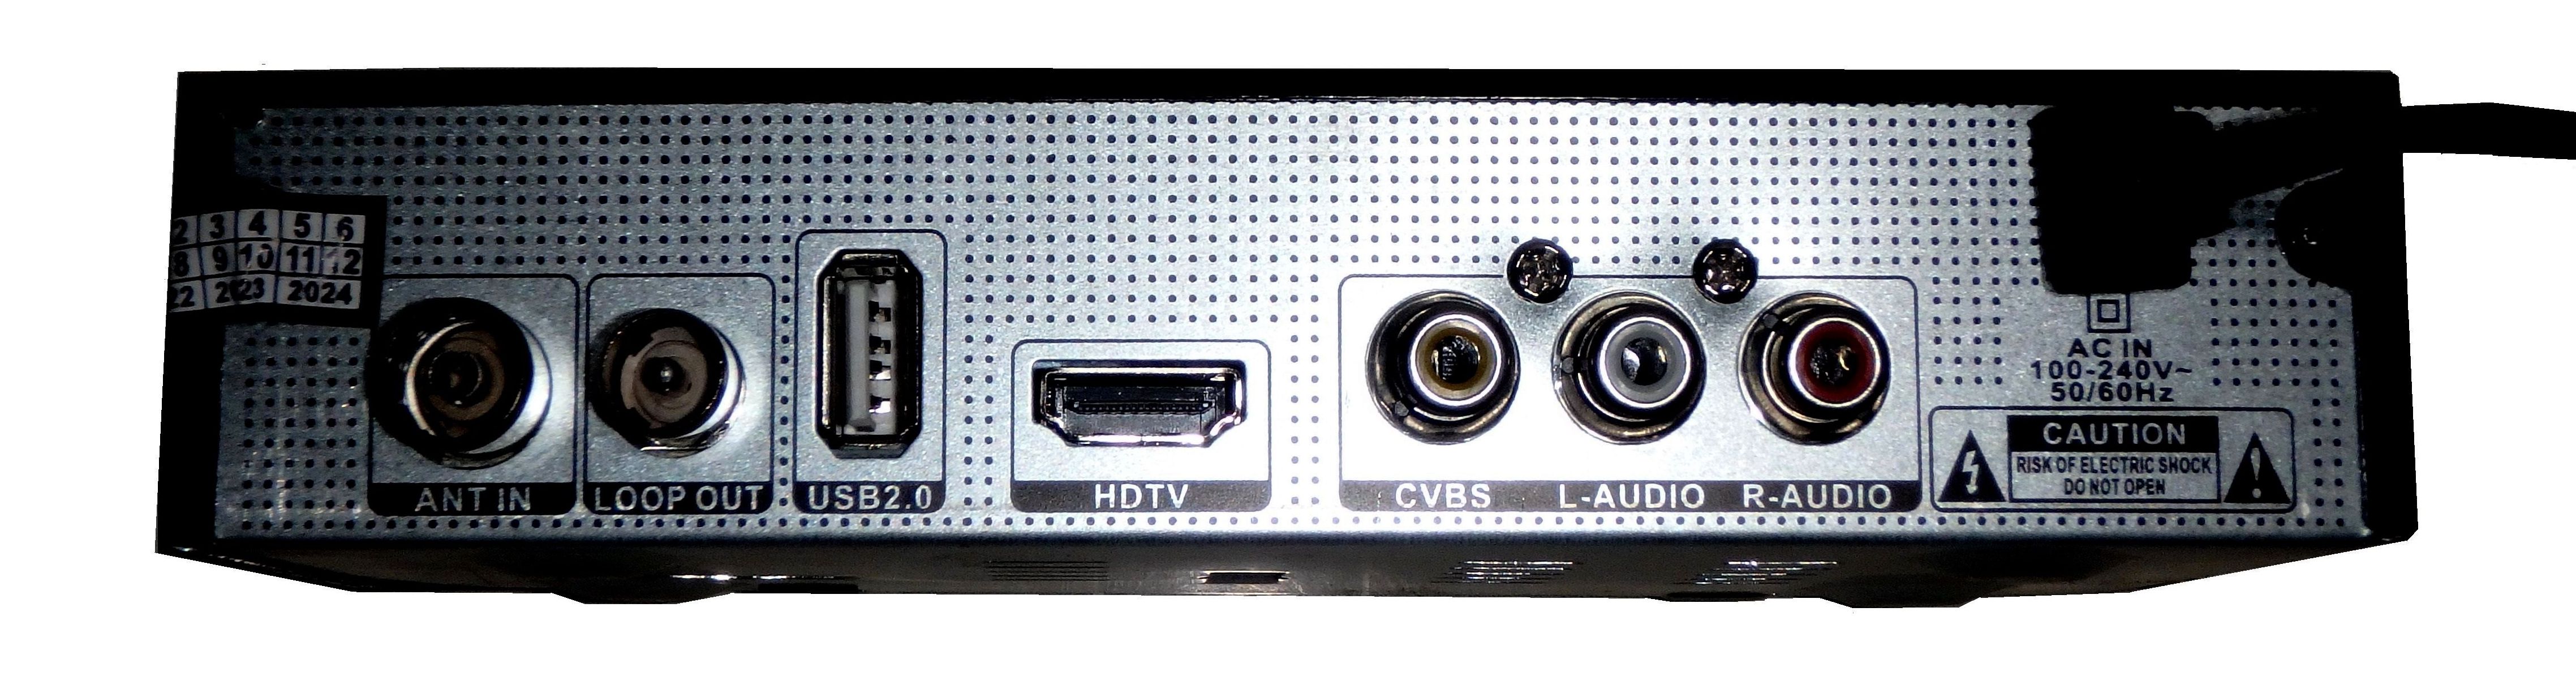
For locations in Jakarta, with the antenna erected on a roof tile about 4 meters high from the ground, and by using Matrix Apple Red Set Top Box, managed to get 50 digital TV channels.

Searching for channels should be done when the weather is sunny, during the day to see the sky with only a few clouds. Because clouds can block radio wave signals from transmitters to TV or radio receivers. Avoid channel searching during heavy rains, as rain impedes radio wave propagation.

The cable length required for the antenna is about 2 meters. Cable insulation remains intact, not peeled.


Cable insulation is only peeled about 1-2 centimeters at one end of the cable. In this section, it will be connected to a coaxial cable, so that the antenna is connected to a TV or radio device.


The other end of the power cable is left wrapped in insulation. This way will protect the antenna from rain water. The signal caught by the antenna will flow to the ground, if the antenna gets wet in the rain, not flowing towards the device. Cable insulation rubber will not reduce the strength of the signal captured by the antenna.

The isolated end of the antenna may be bent slightly, as a hook for attaching the antenna.

Strip the coaxial cable for signal transmission from the antenna to the TV or radio, so it looks like the following photo.

The center conductor of the coaxial cable is exposed by about 1-2 centimeters. The outer conductor is also exposed. The center insulation is intact for about 1-2 centimeters. So that there is a distance of about 1-2 centimeters from the center conductor to the outer braided conductor.

The outer braided conductors are cut and ensured that nothing touch the center conductor. If the center conductor is connected to the outer conductor, then the signal from the antenna will be shorted to the ground. Sometimes also referred to as shorting or antenna short circuit, there is no signal from the antenna going to the device.

Connect the coaxial cable to the antenna, by twisting the center conductor of the coaxial cable with the antenna copper. This connection may also be strengthened with solder.


Make sure there is no fiber from the outer conductor of the coaxial cable touching the center conductor of the coaxial cable, or the copper of the antenna. Seen in the photo above, the outer conductors of the coaxial cable are pulled away from the center conductor.

Cover the connection with electrical tape, until the outer conductor of the coaxial cable is also covered, as shown in the photo below.

Make sure the insulation is tight enough so that rain and dew can't get in. In the photo above, the length of insulated part is about 6 centimeters.

Bend the antenna so that it forms a J shape as shown in the photo below.


The diameter of the J bend is about 1-2 centimeters, so it doesn't too tight. Tie with insulation tape so that the bend does not change. The antenna is ready to be installed. This J bend can be used as a hook for antenna installation.

The photo below shows the antenna erected on a bamboo stick. It can also use wooden pole, plastic pipe, PVC pipe, and others.


It is not recommended to use iron pipe, aluminum, copper, brass, steel roof frame, or other electrical conductors. Any electrical conductor should only be positioned under the body of the antenna. Due to the nature of the electrical conductor that can absorb radio signals.

For outdoor antenna, the signal is usually strong, if the antenna is positioned vertically. The position of the antenna should be higher than the objects around it.

If installed indoor, the antenna can also be positioned horizontally. Indoor antenna can be attached with a nail on the wall. The photo below shows the antenna end is attached to a plastic cable clamp, and nailed to the wall.


Ensure that the copper conductor of the antenna is not touched by the nail. So that the signal from the antenna does not shorted to the ground through the nail.

This antenna is omnidirectional. So you just need to find a place where the TV and radio signals are strong. It doesn't need directional adjustment.

This antenna should be stretched as straight as possible. Do not wind it so that it forms a coil. Because the coil creates resistance (inductance) to the flow of radio wave signals.


Monday, November 21, 2022

Membuat Antena TV Outdoor Indoor Sederhana

Antena dapat dibuat dengan mudah menggunakan material yang biasa ditemukan di rumah. Antena ini dapat disambungkan ke TV dan radio, baik juga untuk TV digital. Antena yang dibahas di artikel ini menggunakan kabel listrik tembaga tunggal, dengan diameter tembaga sekitar 1.5 mm. Tidak perlu membeli kabel yang baru, kabel listrik bekas masih bisa digunakan. 

Pada prinsipnya semua konduktor listrik dapat dijadikan antena untuk menangkap sinyal gelombang radio atau gelombang elektromagnetik. Konduktor listrik antara lain: tembaga, kuningan, besi, baja, alumunium, dan lain-lain.

Untuk lokasi di Jakarta, dengan antena ditegakkan di atas genteng dengan tinggi sekitar 4 meter dari tanah, dan dengan menggunakan Set Top Box Matrix Apple Merah, berhasil mendapatkan 50 saluran TV digital.


Pencarian saluran (channel) sebaiknya dilakukan di saat cuaca cerah, di siang hari agar terlihat langit dengan sedikit awan. Karena awan dapat menghalangi sinyal gelombang radio dari pemancar ke penerima TV atau radio. Hindari pencarian saluran di saat hujan lebat, karena hujan menghambat propagasi gelombang radio.

Panjang kabel yang dibutuhkan untuk antena sekitar 2 meter. Isolasi kabel tetap dibiarkan utuh, tidak dikupas.


Isolasi kabel hanya dikupas sekitar 1-2 centimeter pada salah satu ujung kabel. Di bagian ini nantinya akan disambungkan ke kabel coaxial, agar antena terhubung dengan perangkat TV atau radio.


Ujung kabel listrik lainnya dibiarkan tetap terbungkus isolasi. Tujuannya agar antena terlindung dari air hujan. Sinyal yang tertangkap antena akan mengalir ke tanah (ground), karena antena basah kena air hujan, bukan mengalir menuju perangkat. Karet isolasi kabel tidak terlalu berpengaruh dan tidak mengurangi kuatnya sinyal yang ditangkap antena.

Ujung antena yang tertutup isolasi ini boleh dibengkokkan sedikit, sebagai kait untuk memasang antena.

Kupas kabel coaxial untuk transmisi sinyal dari antena menuju TV atau radio, sehingga terlihat seperti foto berikut.


Konduktor tengah dari kabel coaxial dibuka sekitar 1-2 centimeter. Konduktor luar juga dibuka. Isolasi tengah terlihat sepanjang sekitar 1-2 centimeter. Sehingga ada jarak sekitar 1-2 centimeter dari konduktor tengah ke konduktor luar (serabut). 

Serabut konduktor luar dipotong dan dipastikan tidak ada yang menyentuh konduktor tengah. Jika konduktor tengah tersentuh oleh konduktor luar, maka sinyal dari antena akan menuju tanah (ground). Kadang disebut juga sebagai korslet atau antena sirkuit pendek (antenna short circuit). Tidak ada sinyal dari antena yang menuju ke perangkat.

Sambung kabel coaxial ke antena, dengan cara memuntir konduktor tengah dari kabel coaxial dengan tembaga antena. Sambungan ini boleh juga diperkuat dengan solder.


Pastikan tidak ada serabut dari konduktor luar kabel coaxial yang menyentuh ataupun mendekati konduktor dalam dari kabel coaxial, maupun tembaga antena. Terlihat pada foto di atas, serabut konduktor luar dari kabel coaxial ditarik menjauhi konduktor dalam.

Tutup sambungan dengan isolasi listrik, sampai konduktor luar kabel coaxial juga tertutup, sebagaimana foto di bawah.


Pastikan isolasi cukup rapat sehingga air hujan dan embun tidak bisa masuk. Pada foto di atas, panjang bagian yang tertutup isolasi sekitar 6 centimeter.

Tekuk antena sehingga membentuk seperti huruf J sebagaimana foto di bawah.


Diameter dari tekukan J sekitar 1-2 centimeter agar tidak terlalu patah. Ikat dengan isolasi agar tekukan tidak berubah. Antena sudah siap untuk dipasang. Tekukan J ini boleh digunakan sebagai kait untuk instalasi antena.

Foto di bawah menunjukkan antena ditegakkan dengan batang bambu. Bisa juga menggunakan batang kayu, pipa plastik, pipa PVC, dan lain-lain. 


Tidak boleh ditegakkan menggunakan pipa besi, pipa alumunium, pipa tembaga, pipa kuningan, rangka baja ringan, ataupun konduktor listrik lainnya. Konduktor listrik hanya boleh berada di bawah badan antena. Karena sifat konduktor listrik yang dapat menyerap sinyal radio.

Untuk antena luar ruang (outdoor) biasanya sinyalnya kuat tertangkap jika antena diposisikan tegak (vertikal). Posisi antena sebaiknya lebih tinggi dari benda-benda di sekitarnya.

Jika dipasang di dalam ruang (indoor), maka antena dengan posisi horizontal juga bisa diterapkan. Antena dalam ruangan bisa dikaitkan dengan paku di dinding. Foto di bawah memperlihatkan ujung antena dikaitkan pada klem kabel yang terbuat dari plastik, dan terpaku pada dinding.

Harus dipastikan bahwa tembaga konduktor antena tidak boleh tersentuh paku, agar sinyal dari antena tidak menuju tanah melalui paku.

Antena ini bersifat segala arah (omnidirectional). Sehingga hanya perlu mencari tempat di mana sinyal TV dan radio kuat, tidak perlu penyesuaian arah.

Antena ini sebaiknya dibentangkan selurus mungkin. Jangan digulung sehingga membentuk kumparan atau koil. Karena kumparan membuat hambatan (induktansi) terhadap aliran sinyal gelombang radio.


Friday, October 21, 2022

Simple Plastic Sealing Without Press Machine


In this article, we discuss how to close and seal plastic bag without using a heating press machine. It is using only household tools, namely: a kitchen knife, and a clothes iron. 


Kitchen Knife To Seal Plastic Bags

Prepare a plastic bag to be sealed. Do not fill the plastic bag until it is full, and leave the mouth of the plastic bag empty. So that it is enough plastic area to be pressed.


Heat the kitchen knife on the stove, small stove flames are enough.

Place the plastic bag on a heat-resistant base, such as a wooden or marble cutting board (chopping board). 


Press the hot back of the knife, not the sharp edge of the knife, over the plastic bag. While the knife is moved like a cutting or slashing motion.

The mouth of the plastic bag will be sealed. The very top area of the mouth will be cut off.


Sealing Plastic Bag By Clothes Iron

Prepare a plastic bag that will be sealed by pressing with a hot clothes iron. .

Cut the aluminum foil slightly wider than the mouth of the plastic bag, and about 5 cm long.

The aluminum foil is then folded. Its function is to cover the plastic bag. So that the plastic bag is not directly touched by the hot iron, to avoid plastic bag sticks to the iron.

Heat the iron to the setting for cotton fabrics, or almost to maximum.

Fill the plastic bag, but do not overfill to the top of the plastic mouth. Leave about 2-3 cm high of an empty area from the mouth of the bag.

Fold the mouth of the plastic bag about 1 cm. Cover the folded mouth of the bag with aluminum foil, so that the plastic does not come into direct contact with the hot iron.

Place it on a heat-resistant base such as a wooden or marble cutting board.

Press the mouth of the folded plastic bag covered with aluminum foil with a hot iron for about 10-20 seconds.


Remove the iron, let the aluminum foil and plastic cool by itself for about 10-20 seconds. When cold, the aluminum will be peeled off from the plastic, so it can be separated from the plastic bag.

This method ensures that the plastic is closed and sealed perfectly. Because the plastic mouth is folded and the affixed part is wider.


Wednesday, September 21, 2022

Perekat Plastik Sederhana Tanpa Mesin Pres


Pada artikel dibahas cara menutup dan merekat kantong plastik tanpa menggunakan mesin pres pemanas. Cukup menggunakan alat rumah tangga yaitu: pisau dapur, dan setrika.


Menutup Kantong Plastik Pisau Dapur

Siapkan kantong plastik yang akan ditutup. Isi kantong plastik jangan sampai penuh, dan sisakan bagian mulut kantong plastik agar cukup untuk dipres.


Panaskan pisau dapur dengan kompor, cukup dengan api kecil.

Letakkan kantong plastik di atas alas yang tahan panas, sepertai talenan kayu, atau talenan batu marmer.


Tekan punggung pisau yang sudah panas, bukan sisi tajam pisau, di atas kantong plastik. Sambil pisau digerakkan mirip gerakan memotong atau menyayat.


Mulut kantong plastik akan tertutup. Bagian paling atas dari mulut akan putus terpotong. 


Menutup Kantong Plastik Dengan Setrika


Siapkan kantong plastik yang akan ditutup dengan dipres oleh setrika panas.


Potong alumunium foil sedikit lebih lebar dari kantong plastik mulut kantong plastik, dengan panjang sekitar 5 cm. 


Alumunium foil lalu dilipat. Fungsinya untuk melapisi kantong plastik agar tidak tersentuh langsung oleh setrika panas, sehingga lengket pada setrika.


Panaskan setrika dengan setelan untuk kain katun, atau hampir maximal.

Isi kantong plastik, tapi tidak sampai penuh ke mulut plastik. Sisakan setinggi sekitar 2-3 cm dari mulut kantong.


Lipat mulut kantong plastik sekitar 1 cm. Lapisi mulut kantong yang terlipat itu dengan alumunium foil, agar plastik tidak tersentuh langsung dengan setrika panas.


Letakkan di atas alas yang tahan panas seperti talenan kayu atau talenan batu marmer.


Tekan mulut kantong plastik yang sudah terlipat dan terlapis alumunium foil dengan setrika panas, selama sekitar 10-20 detik.

Angkat setrika, biarkan alumunium foil dan plastik dingin dengan sendirinya sekitar 10-20 detik. Saat dingin alumunium akan terkelupas dari plastik, sehingga dapat dipisah dari kantong plastik.


Cara ini lebih menjamin plastik tertutup dan merekat sempurna. Karena mulut plastik terlipat dan bagian yang menempel lebih luas.


Sunday, August 21, 2022

Induction Motor Start Run Capacitor Function


In an alternating current (AC) electric motors, the starting capacitor functions to increase the initial torque of the motor in one particular direction of rotation. So that the rotor of the motor can rotate in the specified direction. Without a starting capacitor, the rotor just vibrates and makes a buzzing sound. Because it is supplied by alternating current not direct current, so it is uncertain which direction the rotor should turn. Rotor is the rotating part of the motor.

Whereas in direct current (DC) motors, the direction of rotor rotation is determined by the polarity of supplied current, by determining the positive and negative wire connections to the motor.

Some AC motor designs use a switch that is activated by centrifugal force, to cut off the start capacitor when the rotor has reached a certain speed. Furthermore, the motor works with a running capacitor.

Starting capacitor is designed to stay connected in the circuit up to a predetermined speed, which is usually around 75% of full speed. Then the starting capacitor is disconnected from the circuit, usually by a centrifugal switch which is activated at 75% of motor full speed.

In a small single-phase AC motor, the starting capacitor is always connected to the circuit. So that it also functions as a running capacitor.

If the capacitor value does not match the design parameters such as: power, voltage, power factor, etc., it can result in: noise, decreased power, wasteful power consumption, temperature increases so that the motor overheats.

Induction type AC motors are very popular because of their simple design and do not use permanent magnets, so they are cheap. The working magnetic field is only the electromagnetic field in the stator, there is no field from the permanent magnet. While the magnetic field in the rotor is the result of the induction of the magnetic field from the stator. So it does not require a carbon brush to conduct electricity to the rotor. These motors are usually applied to: washing machine, fan, blower, air conditioner condenser and evaporator, refrigerators, exhaust fan, water pump, compressor, and others.

Failure that often occurs in AC motor is a weak or broken capacitor. In washing machines, it often happens that the coil wire breaks, because it is exposed to water. Replacing capacitor is actually quite easy, you can do it yourself on Sunday or holiday. The difficulty is usually in access to damaged components, having to open many other components, such as in the air conditioner (ac).

The following YouTube video shows the characteristics of a faulty capacitor in a fan motor.


If the capacitor is disconnected, and motor is connected to the electric grid, the motor will hum, the rotor is not rotating. If rotor is rotated by fingers, the motor can rotate to the right (clockwise), or to the left (counterclockwise). Furthermore, the rotor will continue to rotate according to the direction of rotation of the finger, but at a lower speed and power than it should.

The circuit schematic for a single-phase induction motor is as follows:


 Schematic description:

ACV = alternating current supply

L1 = main winding

L2 = auxiliary winding

R = squirrel cage rotor

C = capacitor start/run

If the ACV connection is changed from L1, so that ACV is supplying to L2, the rotor will rotate in the opposite direction.

The size of the capacitor can be calculated by the formula:
C = (P . n . 1000) / (V . V . F)

Where:
C = capacity micro Farad (mF)
P = power Watts (W)
n = efficiency in percent (%)
V = alternating supply voltage (VAC)
F = supply voltage frequency Hertz (Hz)

For example, a single-phase induction motor with 100 Watts power, 80% efficiency, supply voltage 220 VAC, frequency supply voltage 50 Hz.

Please note that the efficiency calculation is not written as 80% or 0.8, but it is calculated as 80.

C = (100 . 80 . 1000) / (220 . 220 . 50) = 3.31 mF

Thursday, July 21, 2022

Kapasitor Starting Dan Running Pada Motor AC


Pada motor listrik arus bolak-balik (alternating current, AC), starting capasitor berfungsi meningkatkan torsi awal motor pada satu arah putaran tertentu. Sehingga rotor dari motor dapat berputar ke arah yang ditentukan tersebut. Tanpa starting capasitor, rotor hanya bergetar dan menimbulkan suara berdengung. Hal ini karena arus suplai adalah arus bolak-balik bukan arus searah, sehingga tak tentu ke arah mana rotor harus berputar. Rotor adalah komponen bagian dari motor yang berputar. Starting capacitor juga popular dengan sebutan start kapasitor.

Sedangkan pada motor arus searah (Direct Current (DC) motor), arah putaran rotor ditentukan oleh polaritas arus yang disuplai, dengan menentukan koneksi kabel positif dan negatif ke motor.

Beberapa desain motor AC menggunakan saklar yang diaktifkan oleh gaya sentrifugal, untuk memutus start kapasitor saat rotor sudah mencapai kecepatan tertentu. Selanjutnya motor bekerja dengan running capacitor.

Starting capasitor ada yang didesain untuk tetap terhubung di sirkuit sampai kecepatan yang telah ditentukan, yang biasanya sekitar 75% dari kecepatan penuh. Kemudian starting capacitor diputus dari sirkuit, biasanya oleh sakelar sentrifugal yang aktif pada 75% kecepatan penuh itu.

Pada motor AC satu phase ukuran kecil, starting capacitor akan terus terhubung pada sirkuit. Sehingga juga berfungsi sebagai running capacitor.

Jika nilai kapasitor tidak sesuai dengan parameter desain seperti: daya, tegangan, power factor, dan lain-lain, dapat berakibat: suara berisik, daya menurun, konsumsi daya boros, temperatur meningkat sehingga motor kepanasan (overheating). 

Motor AC dari tipe induksi (induction motor) sangat populer karena desainnya yang sederhana dan tidak menggunakan permanen magnet, sehingga murah harganya. Medan magnet yang bekerja hanyalah medan elektromagnet pada stator, tidak ada medan dari permanen magnet. Medan magnet pada rotor adalah hasil induksi medan magnet dari stator, sehingga tidak memerlukan sikat karbon (carbon brush) untuk mengalirkan listrik ke rotor. Motor ini biasanya diterapkan pada: mesin cuci, kipas angin, blower, air conditioner condenser dan evaporator, kulkas, exhauster fan, pompa air, kompresor, dan lain-lain.

Kerusakan yang sering terjadi pada motor AC adalah kapasitor lemah atau putus. Pada mesin cuci sering juga terjadi kawat kumparan putus, karena terkena air. Penggantian kapasitor sebenarnya cukup mudah, bisa dilakukan sendiri di hari minggu atau hari libur. Kesulitannya biasanya pada akses ke komponen yang rusak, harus membuka banyak komponen lainnya, seperti pada pendingin ruangan (ac). 

Video YouTube berikut memperlihat ciri-ciri kapasitor rusak pada motor kipas angin.


Jika kapasitor putus, saat terhubung ke jaringan listrik, motor akan berdengung, rotor diam. Jika diputar dengan jari, maka motor bisa berputar ke kanan (searah jarum jam, clockwise), maupun berputar ke kiri (berlawanan arah jarum jam, counter clockwise). Selanjutnya rotor akan terus berputar sesuai dengan arah putar jari, tapi dengan kecepatan dan daya lebih rendah dari semestinya.

Skema sirkuit untuk motor induksi satu fase sebagaimana berikut:


Keterangan skema:

ACV = suplai arus bolak-balik

L1 = kumparan utama (main winding )

L2 = kumparan bantu (auxiliary winding)

R = rotor sangkar tupai

C = kapasitor start/run

Jika koneksi ACV dirubah dari L1, sehingga ACV mensuplai ke L2, maka arah putaran rotor akan menjadi kebalikannya.

Ukuran kapasitor dapat dihitung dengan rumus: C = (P . n . 1000) / (V . V . F)

Dimana:

C = kapasitas mikro Farad (mF)

P = daya Watt (W)

n = effisiensi dalam persen (%), tapi tidak diinput per seratusnya

V = tegangan suplai bolak-balik(VAC)

F = frequensi tegangan suplai Hertz (Hz)

Misal sebuah motor induksi fase tunggal dengan daya 100 Watt, effisiensi 80%, tegangan suplai 220 VAC, frequensi tegangan suplai 50 Hz.

Harap perhatikan bahwa pada perhitungan effisiensi tidak ditulis 80% atau 0.8, tapi hanya ditulis 80, tidak ada per seratusnya.

C = (100 .  80 . 1000) / (220 . 220 . 50) = 3.31 mF


Tuesday, June 21, 2022

Digital TV Set Top Box Apple


Analog TV systems use electromagnetic waves (radio waves) for transmitting video and sound signals, in a manner similar to signal transmission for AM radio and FM radio. Like radio signals, analog TV signals can suffer from a lot of interference. The quality of analog transmission decreases the further it is from the source.

Digital TV signals are transmitted in compressed data packets. The data uses the binary numbers 1 and 0, similar to data on computer, DVD player, the internet, and other digital devices. Due to the use of this binary code, the digital signal is subject to less interference than the analog TV signal.

Indonesian TV broadcasts so far are analog broadcasts. The Indonesian government is campaigning for an analog to digital TV migration program (MODI). The MODI program is targeted for completion in November 2022.

Set top box (STB) devices are also called: decoders, converters, receivers, signal converters, signal processors. This device functions to process digital TV broadcast signals so that they can be displayed on analog TVs, both tube TVs and flat screen TVs such as plasma and LED. Some of the new products of flat screen TVs can process digital signals, so there is no need to add a set top box.

Because it still uses radio waves for data transmission, digital TV still uses antenna. Old TV antennas, both the existing VHF and UHF types, can still be used. There is no need to use a satellite dish, because the signal does not come from the satellite. If using a set top box, then one set top box unit is for one TV.

Just like analog broadcasts, digital broadcasts are free (FTA, Free To Air), without the need for a subscription. Especially for the poor, the Indonesian Ministry of Communication and Information (Kominfo) plans to distribute free set top boxes.

Matrix is ​​known as the maker of satellite dish receivers, now they also make set top boxes to process digital TV broadcasts. One of the devices made is named Matrix Apple DVB T2 Red, which is claimed to be more sensitive to signals than other devices.

DVB T2 stands for Digital Video Broadcasting Terrestrial second generation. Terrestrial means earth based transmitted signal, it is not satellite signal.

This Red Apple Matrix has a red box, the body of the device is black, the advantages include:

- Good signal receiving

- Full HD 1080p - Super sharp images

- Memory 8 Mb

- 2 USBs, one for wifi dongle, one for flash disk memory

- HDMI port or HDTV connection commonly used on today's TVs

- RCA port, connection consists of 3 coaxial cables for: video (CVBS), left audio, and right audio. It can be connected to a tube TV, or any other old TV that generally uses an RCA connection.


Rear view of the Red Apple Matrix, from left to right:

ANT IN to connect to the antenna.

The LOOP OUT is connected to the antenna IN connector on the TV, so that it can still receive analog broadcasts.

USB2.0 for external memory (flash disk), can also be used for wifi dongle, the other USB connector is on the front, under the words APPLE, as shown in the very top photo.

HDTV to connect to a TV with an HDMI (High-Definition Multimedia Interface) cable as below. This cable is not included in the Apple Matric box, must be purchased separately.


CVBS (Composite Video Baseband Signal) is a video signal output for TVs with yellow RCA connection.

L-AUDIO is the left sound signal output for a TV with a white RCA connection.

R-AUDIO is the right sound signal output for a TV with a red RCA connection.

RCA cables for the above three connections are included in the Apple Matrix box, no need to be purchased separately.

The available menus are shown on the TV screen as below, by pressing the Menu button on the remote.


The Search menu is used to search for digital broadcasts, by first entering the postal code where the TV is located.

If the YouTube application is selected, a simple menu from YouTube will appear as follows.


Then press the Menu button on the remote again, a more complete YouTube menu will appear.


Some overseas / international broadcasts will be shown: Vevo, Top Gear, Arabs Got Talent, BBC, Ellen Show, Sky News, Al Jazeera, Bein Sport France, MBC, Arab Idol, OSN, Shahid VOD, CBC.

In the Application menu (APP) there are international broadcasts of IPTV (Internet Protocol TV) such as from Arabic, Russian, Iranian, WeTV, Facebook Game, Quran.

Add a wifi dongle (antenna and wifi receiver) to be able to capture internet broadcasts. The wifi dongle must be purchased separately and plugged into the USB connector on the set top box.


Use the MeeCast app on Android and Apple smartphones, so you can surf the internet, watch YouTube, TikTok, Vidio, Facebook, Instagram, and more without ad breaks. The MeeCast application can also be used as a remote to control viewing on the TV.


Screenshot of a smartphone with MeeCast connected via wifi with a TV as shown below.


MeeCast can be turned off when the TV is broadcasting internet broadcasts, in order to save internet quota.

If the TV is turned off, then the STB must also be turned off, at least the STB exits the internet menu. So that the internet quota is not absorbed by the STB, even though the TV is not turned on or not watched.

The software on the STB needs to be upgraded if the latest version is available, it can be checked via the internet. Use the Upgrade menu to upgrade the version.

The Red Apple Matrix has been certified with SNI, EWS certificate and the Directorate General of Post and Telecommunication. More details about STB can be read at matrixparabola.com.