
National deep well water pump (jet pump) was made in the 1980s. It is rusty and porous around the outlet. This water pump has no longer used an automatic system based on pressure, so the function of the pressure tank is not too important. The pump is controlled by a switch, that is in the reservoir water tank.
Read also how to fix pressure washer loses pressure when trigger pulled.
Water pump pressure tank serves to contain water, and keep water pressure constant. Without this tank, the water pump will start and stop quickly. Usually occurs if not using a reservoir water tank. The pump electric motor draws a large electric current at start. If the pump starts and stops repeatedly and quickly (short cycling), and lasts for a long time, there is a risk of overheating. Pump cooling fans are usually only effective at relatively high rotation, not at start. So the pump can be overheated, and the pump may be burnt. Electricity costs will also be high when the pump turns on and off repeatedly.
The following are the steps to modify a rusted water pump tank, modified with a hose. The equipments used are only simple basic tools such as: plate shears, hacksaw, screwdrivers, spanners, and other tools for removing and re-installing the pump.
If all tools and materials or components are available, this work can be completed in one day or around 8 hours. Materials required by this National jet pump are:
It is recommended that the pump machine is removed from the tank, before the modification work begins. So that it is not difficult to position the tank body.
The following YouTube video also shows this work procedure.
The hose is intentionally tied with a clamp, so that it is easy to remove if the pump will need to be repaired later. If using a PVC pipe instead of the hose, the pipe must usually be glued, so the pipe must be cut if it is removed later. In addition, the hose can be purchased partially, according to the required size. While the PVC pipe must be purchased one full length, it cannot be bought partially, so the rest pipe will be wasteful.

Cut out the rusted tank part, like the photo above. Next enlarge the hole with a hacksaw, so that it will be easy to cut the pipe in the tank.

Enlarge the hole with a hacksaw, so that later it will be easy to saw the output pipe in the tank. In the photo above, the hole size is around 12 x 20 cm.
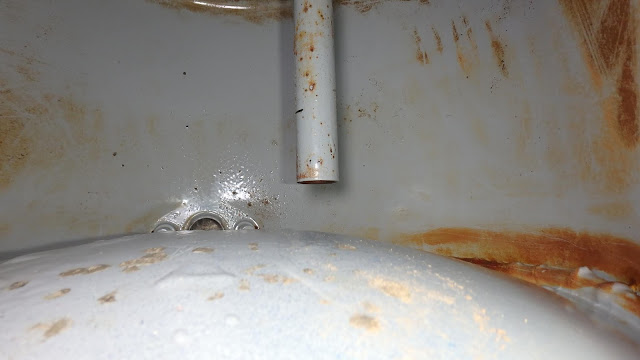
The output pipe is connected to the pump, this pipe needs to be shortened. So that the hose can be curved smoothly. As can be seen in the photo above, the inside detail of the tank, the output pipe is about 5 cm from the top of the tank base which is curved.

Because the space is narrow, the handle of a hacksaw is difficult to use. Hacksaw can be wrapped with a hose as a handle.

Cut the output pipe to become shorter with a hacksaw.

Shown in the photo above the shortened output pipe. Pipe is hanging about 12 cm from the bottom of the tank. So that enough space for the hose to bend smoothly.

The 1 inch hose must be widened a bit, so the hose can be fitted to output pipe. Heat the cut pipe and the hose mouth. Then insert the hot cut pipe into the hose to expand that hose.

The hose must also be slightly widened to fit the 1/2 inch PVC adapter. The pipe that connect to water reservoir is 1 inch in size. So it needs a PVC adapter 1/2 to 1 inch.
.
Fit the hose to the pump output pipe, lock it with hose clamp. Fit the other end of the hose to the network pipe, or to the water reservoir, via 1/2 to 1 inch PVC adapter.
Hose installation can be easier with lubricant such as used oil or grease. Lubricant also helps to close small gaps to avoid leak.
Block the small hose that lead to AVC (Air Volume Control), because it is not used anymore.

In the photo above, on the pump impeller housing, the AVC line is blocked with screw and glued.
AVC functions to adjust the volume of air in the pressure tank. If there is too little air in the tank, the pump will be short cycling. If there is too much air, there will be less water in the tank.
The power cable on the pressure switch can also be disconnected and connected directly to the electric motor, no longer via pressure switch. Shown in the photo below 2 cables from the switch have been disconnected.

The wire from the electric grid is connected directly to the pump motor.
The following photo shows the hose installation to water reservoir line, it is seen from the top of the pump. This modification work has been completed, the water pump is ready to work again.

Also seen in the photo above, the pump is based on rocks covered ground, and the pump is laid onto bricks foundation. If the pump leaks, the water can immediately seep into the ground. If it is cemented, the leaked water can accumulate causing rust. The water can even cause an electric short, if there is too much water leaking. Rocks are cheaper than cement, it can also prevent rat nesting.
If all tools and materials or components are available, this work can be completed in one day or around 8 hours. Materials required by this National jet pump are:
- hose 1 inch diameter, about 60 cm long
- hose clamp 2 pieces, stainless steel for the above hose
- PVC pipe adapter 1/2 to 1 inch 1 piece
It is recommended that the pump machine is removed from the tank, before the modification work begins. So that it is not difficult to position the tank body.
The following YouTube video also shows this work procedure.
The hose is intentionally tied with a clamp, so that it is easy to remove if the pump will need to be repaired later. If using a PVC pipe instead of the hose, the pipe must usually be glued, so the pipe must be cut if it is removed later. In addition, the hose can be purchased partially, according to the required size. While the PVC pipe must be purchased one full length, it cannot be bought partially, so the rest pipe will be wasteful.

Cut out the rusted tank part, like the photo above. Next enlarge the hole with a hacksaw, so that it will be easy to cut the pipe in the tank.

Enlarge the hole with a hacksaw, so that later it will be easy to saw the output pipe in the tank. In the photo above, the hole size is around 12 x 20 cm.

The output pipe is connected to the pump, this pipe needs to be shortened. So that the hose can be curved smoothly. As can be seen in the photo above, the inside detail of the tank, the output pipe is about 5 cm from the top of the tank base which is curved.

Because the space is narrow, the handle of a hacksaw is difficult to use. Hacksaw can be wrapped with a hose as a handle.

Cut the output pipe to become shorter with a hacksaw.

Shown in the photo above the shortened output pipe. Pipe is hanging about 12 cm from the bottom of the tank. So that enough space for the hose to bend smoothly.

The 1 inch hose must be widened a bit, so the hose can be fitted to output pipe. Heat the cut pipe and the hose mouth. Then insert the hot cut pipe into the hose to expand that hose.

The hose must also be slightly widened to fit the 1/2 inch PVC adapter. The pipe that connect to water reservoir is 1 inch in size. So it needs a PVC adapter 1/2 to 1 inch.

Fit the hose to the pump output pipe, lock it with hose clamp. Fit the other end of the hose to the network pipe, or to the water reservoir, via 1/2 to 1 inch PVC adapter.
Hose installation can be easier with lubricant such as used oil or grease. Lubricant also helps to close small gaps to avoid leak.
Block the small hose that lead to AVC (Air Volume Control), because it is not used anymore.

In the photo above, on the pump impeller housing, the AVC line is blocked with screw and glued.
AVC functions to adjust the volume of air in the pressure tank. If there is too little air in the tank, the pump will be short cycling. If there is too much air, there will be less water in the tank.
The power cable on the pressure switch can also be disconnected and connected directly to the electric motor, no longer via pressure switch. Shown in the photo below 2 cables from the switch have been disconnected.

The wire from the electric grid is connected directly to the pump motor.

Also seen in the photo above, the pump is based on rocks covered ground, and the pump is laid onto bricks foundation. If the pump leaks, the water can immediately seep into the ground. If it is cemented, the leaked water can accumulate causing rust. The water can even cause an electric short, if there is too much water leaking. Rocks are cheaper than cement, it can also prevent rat nesting.