
The Honda i-DSI (Intelligent Dual & Sequential Ignition) has two spark plugs per cylinder. Each pair of spark plugs is ignited sequentially with intervals between them, depending on engine speed and load. This results in a more complete combustion of gasoline. That is why fuel consumption is so economical.
This spark plug replacement procedure is also can be seen on YouTube video below.
As the space becomes cramped and congested, replacing spark plugs becomes more difficult. But if you know how to do it, it will be much easier. only by using a few simple hand tools. In the photo below you can see: 3/8 inches ratchet handle, 10 mm socket, 16 mm spark plug socket, 3/8x3 inches extension, 3/8x6 inches extension.

A 10 mm socket wrench is used to remove and install: the cover that reads i-DSI, and the spark plug coils. In total there are 2 pieces of 10 mm head size bolts (M6 thread) for the cover, and 8 pieces of 10 mm bolts to secure coils.
The retainer ball in the extension must be strong enough. So that the spark plug socket is not left in the spark plug hole when installed. Because the position of the spark plug is in the hole as deep as about 13 cm.

Inside the spark plug socket there is a rubber as plug holder. The rubber holds spark plug, to ensure plug does not fall when it will be installed, or when taking the spark plug from the spark plug hole. Also to keep the position of the spark plug in a straight line with the socket and the thread on the cylinder head, in order to prevent damage to the thread.

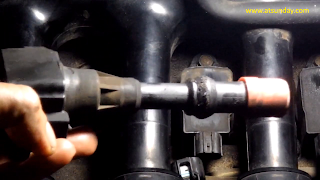
Below photo shows how to test the strength of the locking ball (spring-loaded detent ball). Connect the extension to the spark plug socket. Insert spark plug into the socket. As in the photo below, the left hand holds the extension, the right hand pulls the spark plug out of the socket. The spark plug must be able to detach from the socket, while the extension must remain connected to the socket.

Because of the narrow and deep spark plug space. Spark plug socket can be left in the spark plug hole, and difficult to be taken out. Especially if the position of the spark plug hole in the back row.

The photo below shows the position of the four spark plug coils in the front row.

The row of four coils on the back is a bit difficult to see. In the photo below they are indicated by the numbers. The coil position are about under those numbers.

The rear number four spark plug position is the narrowest. The photo below shows the position of the rear number four coil.

Disconnect all the cable connectors on the coil, by pressing the clip on the connector. Then the connector is pulled to release. Don't pull the cord.

The photo below shows two no clip connectors, because they are broken. But those connectors are still good and can be used.

Also remove all the coil connectors on the back row.

Remove the bracket that holds the rear wiring, near the number four rear spark plug. In the photo below, you can see the left hand holding the wiring, and the index finger pressing the locking clip. Then the cable is pushed to the backward of the car, until it is released from the bracket. The photo also shows the position of the clip near the throttle cable, which is transverse along the photo.

Remove the bracket that holds the rear coil wiring. In the photo below shows the bracket in the red circle, near the engine oil fill hole, or near the rear number one spark plug. The wiring is held by the left hand, and removed from the bracket by pushing towards the left side of the car body, or towards the right side of the photo.

By detaching and freeing the coil wiring harness from those two brackets, it will provide space to remove coils and spark plugs.
Remove all 10 mm coil holder bolts, using a 10 mm socket wrench.

Once the bolt is removed, the coil can be easily removed from the spark plug hole by pulling it up.
The photo below shows the spark plug hole about 13 cm deep.

Actually the spark plug may be removed now. But sometimes there is oil or dirt that gets into the spark plug hole. If the spark plug is removed, the oil will enter the combustion chamber, which can cause scale and make valves leak, resulting in reduced compression and low power.
If the oil that enters the combustion chamber is plenty. When engine is started, oil can cause the piston to jam, because the oil cannot be compressed, or it is called a hydraulic lock. If this happens, then you must open spark plugs in all cylinders, at least one spark plug per cylinder. Make sure no coil connector is connected to prevent electric spark and gasoline burning. Then start the engine, so that the oil that enters into combustion chamber is pumped by the piston, and exits through the spark plug hole.
Cut cardboard about 15x3 cm. Bend slightly lengthwise to make it stiffer. As the photo below.

Insert the cardboard into the spark plug hole.

The cardboard will absorb the oil that has accumulated in spark plug hole. This oil can come from seepage of the seal on valve cover. This is especially happened in the rear spark plug hole.

If there is an air compressor with a long nozzle, so it can fit into the spark plug hole. Then the dirt and oil that collects in the spark plug hole can be sprayed by the compressor. So that compressor air blows out dirt and oil.
To remove the rear number four spark plug, connect a 3 inches extension to the spark plug socket.

Insert socket and 3 inches extension into the rear number four spark plug hole. Due to the depth of the hole, the extension height of 3 inches is about the mouth of the hole. So there is no room for the ratchet handle.

Connect the 6 inches extension, to extend the 3 inches extension. So that the ratchet can be connected and rotated from above, as in the photo below.

Loosen and remove the rear number four spark plug with a ratchet. It can be seen in the above photo that the space above the ratchet's head is limited.
Because of this narrow space, the connection of a 3 inches extension, then a 6 inches extension, then a ratchet handle, must be done one at a time or in stages.
After the spark plug is removed from the cylinder head. Remove the ratchet. Socket and both extensions cannot be lifted at the same time because the narrow space. The next steps are: the right hand lifts the 6 inches extension, until fingers of the left hand can catch the 3 inches extension. Then 6 inches extension is pulled and disconnected.

Then the left hand holds and lifts the 3 inches extension, along with the socket and spark plug to be replaced.

Installing a new spark plug is the reverse of removing the old spark plug procedure. Insert the new spark plug into the socket. With a 3 inches extension, the socket and spark plug are inserted into the spark plug hole. Then connect with a 6 inches extension and a ratchet handle.
See photo below. The left hand ensures a perpendicular extension. The right hand holds the ratchet, near the head of the ratchet. Turn ratchet clockwise, so that the spark plug fits into the cylinder head thread. Rotate with the ratchet until the spark plug reaches the bottom.

Move your right hand to the end of the ratchet, as in the photo below. Strengthen by half a turn, or about 180 degrees. This way ensure spark plug is fitted tightly. But also it is still easy to be removed later when the next replacement.

The spark plugs used in this procedure are:
NGK BKR6E-11
Denso K20PR-U11
There is another way to prevent the socket from being left in the spark plug hole, by removing the rubber plug holder in the socket. In this way the spark plug will be left in the spark plug hole after being loosened. Then the spark plug is pulled out by tools such as tweezer, plier or crocodile plier.
Then a new spark plug is put into the spark plug hole by plier. The socket is inserted into the spark plug hole while rotating slowly, so that the spark plug is caught by the socket. After the spark plug is in the socket, it is directed into the thread in the cylinder head. Then the socket is turned clockwise so that the spark plug is fitted.
Because the spark plug is not held in the socket, this method is successful in preventing the socket from being left in the spark plug hole. But this method should not be recommended. When the spark plug is inserted into the hole, there is a possibility of falling and change the spark plug gap. Also, because the spark plug is not properly gripped by the socket, it is possible that the spark plug does not fit properly into the cylinder head thread. So that it can damage the thread in the cylinder head, and it will be expensive to repair.